 |
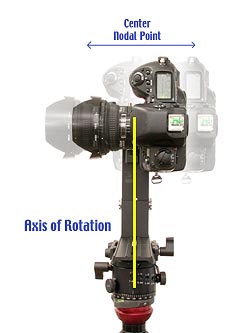
Entrance Pupil Alignment
(Formerly Nodal Point)
|
Update: January, 2008
For many years, the VR photo community mistakenly referred to the no-parallax point of a lens used for panoramic stitching as its "nodal point." In the case of certain swing lens design panoramic cameras, the rear nodal point is indeed the point about which the lens swings or pans. However, for the panoramic photography done by most VR photographers where we stitch a series of sequentially panned images together, the proper term for this no-parallax point is the "entrance pupil." You will see it referred to both ways in different publications and web tutorials. All the principals of aligning a camera/lens combination properly for panoramic stitching still apply, no matter what term is used.
Thanks to Richard F. Lyon, Ted Chavalas, Jay Kumler, and J. Brian Caldwell for their advice and expertise
The entrance pupil of a lens is the point about which a lens is rotated where close and distant subjects focused on the film plane maintain their relative positions to one another. Successful panoramic photography requires that the axis of the camera's rotation be positioned at the entrance pupil of the lens. Otherwise, foreground and background subjects change their relative positions when the camera pans, causing misalignments and stitching errors between shots.
The position of this entrance pupil can be different for every lens. However, on wide angle lenses it is often found between the midpoint of the lens and the aperture ring.
Unfortunately, lens manufacturers do not mark entrance pupils on the lens barrels, so VR photographers need to determine this position before shooting. This is done by mounting camera and lens on an adjustable VR pan head and observing the relationships of foreground and background subjects through the viewfinder as the camera is panned. Alignment of the panning axis with the entrance pupil of the lens can be achieved fairly precisely this way. Note however, that this only works if the camera has a reflex or through-the-lens viewfinder.
If your camera is not a single lens reflex, or the viewfinder does not show exactly what the lens sees (as is the case with rangefinder, twin lens reflex, point and shoot, and most consumer digital cameras), then your entrance pupil alignment will probably have to be done by trial and error. Many digital cameras have a video output jack, or can display a live video image on their LCD screen. Since the image is generated by the image sensor inside the camera, it is possible to use this quite effectively for entrance pupil alignment.
This alignment is important for the best quality results. However, it becomes less critical the further away your subjects are from the lens. As long as your closest subject is 3-4 feet (or more) away from the camera, entrance pupil misalignments cause few, if any, stitching problems - particularly when using very wide lenses. One should always avoid sloppy shooting technique, but knowledge of the degree of forgiveness involved can be a tremendous help when you find yourself unable to use a tripod or pan head at all. Entrance pupil misalignments increase in significance the closer your foreground subjects are to the camera.
There is a rule of thumb that the time, care and expense that you don't devote to proper technique during shooting, will be multiplied 10 times over correcting in post production. While today's digital imaging technologies make it possible to fix just about anything after the fact, you are usually far better off doing things right up front, than you are trying to "fix them in post."
Entrance Pupil Alignment Process
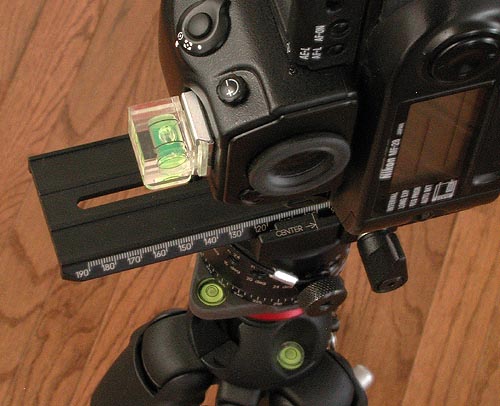
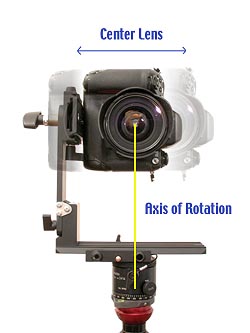
To find the entrance pupil of a lens, first mount the camera and lens on an adjustable VR pan head. The camera should be mounted in a portrait (vertical) orientation with the center of the lens positioned directly over the pan axis of the VR head.
Step 3: Once you have the lens centered over the pan head rotation axis, you can find the entrance pupil by adjusting the camera forward or backward on the VR head. This process is a visual one, and will require you to have a vertical edge of some sort in your foreground that you can line up with another vertical edge in the background. Adjust the camera forward or backward while looking through the viewfinder as you pan the camera back and forth, trying to find a position over the pan head rotation axis that keeps the foreground and background subjects consistently aligned.
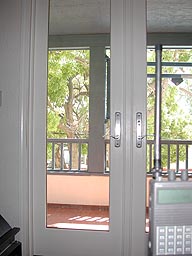
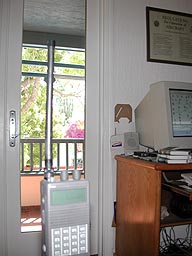
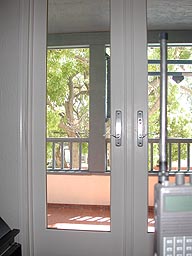
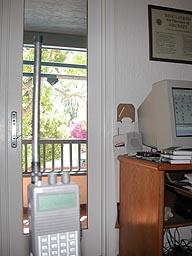
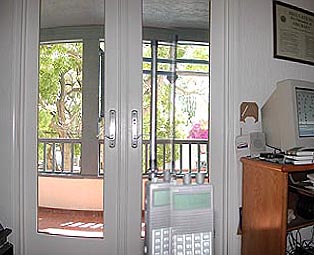
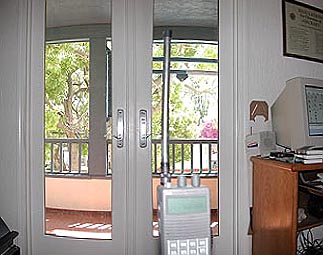
Optimally, you'll want a foreground subject less than a foot away from the front of the lens, and a background subject at or near infinity focus. Good vertical background lines include edges of buildings, windows, door jambs, etc. (assuming the structure is plumb). Foreground subjects should be easily moved and as close to vertical as possible. Examples can include the edge of a hardcover book standing upright on a table, a light stand or the edge of a box.
If the foreground subject moves in the same direction as you are panning relative to the background object (i.e. the foreground subject moves toward the left as you pan to the left), then the lens is mounted too far behind its entrance pupil and the camera needs to be adjusted forward. If the foreground subject moves in the opposite direction relative to the background as you are panning (i.e. the foreground subject moves to the right as you pan left), then the lens is mounted too far in front of its entrance pupil and needs to be adjusted backward on the pan head.
Once you have the entrance pupil of the lens positioned properly over the center of rotation of the pan head, the foreground and background objects will remain stationary relative to one another in your viewfinder as you pan the camera.
Step 4: Lock this position on your tripod head by tightening any adjustment knobs or screws. Then be sure to mark this position so that you can quickly return to it when using this camera and lens combination again.
Finding the entrance pupil for other camera or lens combinations is virtually identical. However, the process can be more difficult with consumer or non-SLR digital cameras, because you do not see the actual image being focused by the lens when you look through the viewfinder. With most of these cameras, the viewfinder contains its own miniature optics that roughly approximate what the lens of the camera records. These viewfinders therefore cannot be used for entrance pupil alignments.
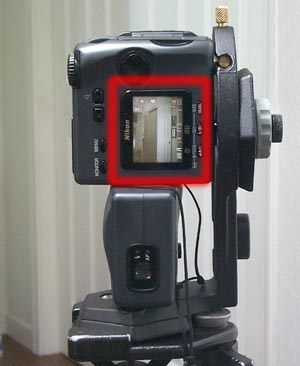 |
| Use LCD monitor for entrance pupil alignment with digital cameras such as this Nikon Coolpix model. |
Many of these digital cameras allow for use of their LCD screens as a "live" video monitor, showing the image that is captured through the camera's lens by the image sensor inside the camera. You can use this "monitor" ability to align the entrance pupil, panning back and forth while watching the relationship between foreground and background subjects, just as you would looking through the viewfinder of an SLR camera.
For digital cameras that don't have the monitor capability, you will have to shoot a series of foreground/background images on a trial and error basis, and perhaps even download them to your computer, in order to determine the proper alignment of the entrance pupil. Kaidan, a popular manufacturer of VR photography equipment, makes a number of molded or preset pan heads for specific digital cameras. If they have one available for your particular camera, the entrance pupil alignment will already be incorporated into the head design, and you can simply mount your camera and shoot without even thinking about such adjustments.
 |
Camera-specific VR heads, such as this one from Kaidan, are available for a wide variety of consumer digital cameras. These heads are pre-aligned for the entrance pupil of the specific camera/lens.
|
Once you have the entrance pupil aligned, you should carefully mark the position on the VR head so that you can quickly return to the proper alignments every time you shoot with that camera and lens combination. You will need to align every camera and lens that you use for panoramic photography in this manner. The entrance pupil is likely to be different for every lens, even between lenses of the same focal length from the same manufacturer. I have two ultrawide 18mm Nikkors, one an autofocus f/2.8 lens and the other an older manual focus f/3.5 lens. They both have different rear entrance pupil positions, and thus require different alignments, even when using the same camera.
Rather than having to align the entrance pupil every time they shoot, many VR photographers simply use a single camera and lens combination with a VR head that is pre-aligned.
Some photographers will even dedicate separate heads, each to a specific camera/lens combination that they use regularly. There is a definite weight and bulk disadvantage to this method, since one has to carry a different pan head for every combination of camera or lens you might use, but those who do this tend to pack them in separate kits. For example, one kit might include a pre-aligned head with a camera and ultrawide 14mm lens for shooting interiors, while another might include a 24mm lens, more suitable for outdoor and landscape panoramas.
The best approach I've found seems to be to commit a single camera and lens as your principal panoramic VR kit. I shoot 95 percent of my work with the same Nikon camera body, 18mm lens and preset pan head. Having too much equipment can be almost as problematic as having too little. When in doubt, keep your equipment choices as simple as possible.