 | Case Study: Review of Nikon D3 D-SLR Camera
|
| Case Study: Review of Nikon D3 D-SLR Camera
|
![]()
Review by Scott Highton for Virtual Reality Photography (www.vrphotography.com)
March, 2008
Background
August, 2008 Update:
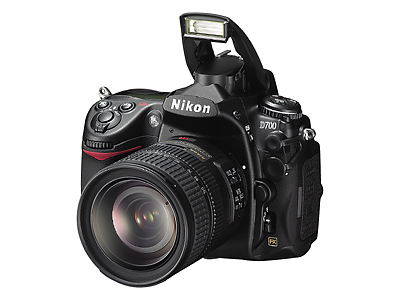
On July 1, 2008, Nikon announced the D700 – a "prosumer" version of the D3. Priced about 40% lower than the D3, the D700 offers the VR photographer many of the attractive features of the D3, including a full frame CCD sensor. For a comparison of the two models, see the update at the end of this review. Click here.
![]()
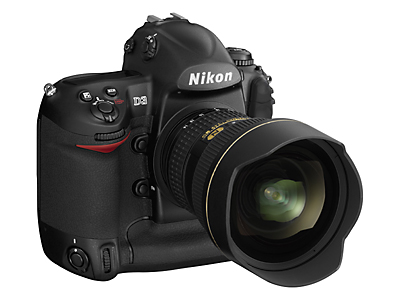
In August, 2007, Nikon announced the D3, a full-frame professional digital camera that Nikon photographers have been waiting years for. The announced specifications for the camera were stunning, and many wondered whether the camera could actually live up to the hype that surrounded it. The camera began shipping in November, and most reviews have indicated that it does indeed live up to its hype. While Nikon has worked very hard to keep up with demand, the cameras are still on back order at many pro retailers.
The D3 holds great promise for VR photographers, particularly those who have significant investments in Nikon lenses from years of shooting with Nikon’s venerable 35mm systems. Nikon generously loaned Virtual Reality Photography a D3 in February for several weeks, so that we could test it from the unique perspective of VR photographers. Many thanks to Bill Pekala at NPS for this assistance.
Within the first two days of the camera arriving, I had little doubt that a D3 would become my next camera purchase. The more I used it, the more impressed I was with its capabilities. Finally, I found a digital camera that is actually more capable than my older 35mm cameras, and which can produce equal, if not better quality imagery. Since my first pro digital SLR (a Kodak DCS 460), every digital camera I’ve owned always had serious shortcomings. Most notable among these was the fact that they didn’t allow me to fully utilize the wide fields of view of my 35mm lenses. For this reason alone, I never fully converted to digital as have so many of my fellow pros, continuing to shoot both film and digital, depending upon the assignment.
Certainly Nikon has offered newer ultra-wide lenses in its reduced-size DX format (such as the Nikkor 10.5mm full frame fisheye, and the Nikkor 12-24mm zoom), but I didn’t like the idea of buying new lenses to replace perfectly good ones I already own, in a format that may only be around for a limited time. While I am not privy to any inside information, it would seem that costs of making good full-frame sensors will continue to drop, so these sensors will likely start appearing in prosumer and even consumer camera models soon. If I had to guess, within 5–10 years, DX and other reduced-format lenses will be relegated to bargain bins on eBay.
While Canon has had full-frame sensors available in their high end cameras for several years now, the idea of switching systems has never been attractive to me due to my significant investment in Nikon optics. (I own about 20 different lenses.) I have patiently stuck with Nikon over the years because of this. One of the reasons I’ve remained a dedicated Nikon photographer is the fact that Nikon has retained backward compatibility and consistency with its lens mount. You can still use most 30–40 year old Nikon lenses even on Nikon’s newest camera bodies. When Canon updated their lens mount to the EF style in 1987, Canon photographers wound up having to replace most of their FD lenses in order to use the new EOS camera bodies. That was expensive and discouraging for most pros.
There are also a number of exotic lenses that Nikon has produced over the years, including the 8mm f/2.8 fisheye used by many VR photographers, for which Canon has never offered an equivalent.
Nikon’s D1 – its first D-SLR released in 1999, had an image sensor that was about 70 percent of the size of a 35mm frame, resulting in a 1.5x focal length multiplication factor. Every Nikon D-SLR since then has maintained this same DX format – until now. The D3 boasts what amounts to a full-frame 35mm size CMOS sensor, which Nikon calls its FX format. So far, this is the only Nikon digital camera featuring this. (The D300, which was announced at the same time as the D3, still uses only the smaller DX format.)
D3 Features
The feature list for the D3 camera is a sight to behold. There are so many features that it’s pointless to reproduce them all here. For those interested, a 40-page brochure can be downloaded from Nikon at: http://chsv.nikonimaging.com/global/products/digitalcamera/slr/d3/pdf/d3_40p.pdf
You can also download a PDF of the entire 446-page D3 user manual from Nikon’s web site at: http://www.nikonusa.com/pdf/manuals/noprint/D3_en_noprint.pdf
For the purposes of this review, I’ll highlight the features that seem most important to VR photographers. Some of these are obvious, while others don’t really seem necessary until you try them. Recognizing that most VR photographers also use their cameras for other types of work, I’ll also include features that support a broad variety of other uses.
 |  |
These include:
Initial Impressions
Very impressive! The longer I used this camera, the more enamored I became with it. Everything about the D3 seems designed to give the photographer control. There are more options and menus than your mind can absorb even over multiple shooting sessions, but they are, for the most part, intuitive – particularly for existing Nikon shooters. While the D3 is unlike any previous Nikon, it retains the overall ergonomics and user interface that photographers have come to expect from Nikon pro cameras.
I tested the D3 in a number of different shooting situations, from panoramic sequences on location (for stitching), to studio and controlled environments. I shot high speed sports action, as well as low-light night environments. Almost every step along the way, I’d catch myself smiling. I finally had a digital camera in my hands that I didn’t have to make excuses for – one that I didn’t have to create “workarounds” for in order to use effectively. This camera made photography exciting again.
There is, however, one very serious warning I must offer involving the default setting for the “No Memory Card” menu. Fresh out of the box, this menu is set to “Enable release” so you can shoot pictures to your heart’s content without a memory card in the camera. This is great for your initial familiarization efforts. However, if you leave it set this way, the camera will act as though it is recording images as you shoot, even though it is not. It will store up to 40 images in the memory buffer. After you’ve shot them, you can go back and review them in camera, but THEY HAVE NOT BEEN SAVED (nor can they be by inserting a CF card after the fact)!
Once you turn the camera off, these images disappear. Also, you can keep shooting beyond these 40 images, and the new images will simply overwrite the old in the buffer. In theory, you could shoot hundreds of images thinking that they’re being saved to a card because you can review many of them on the camera’s monitor, but if there is no memory card inserted, you will not have recorded anything.
I recommend that the first thing you do after getting your camera is to find the No Memory Card menu and set it to “Release locked.” This will prevent the camera from firing unless there is a memory card installed in at least one of the camera’s two CF card slots. That way, you won’t inadvertently blow an entire shoot because there was no card in the camera. (Kind of like forgetting to put film in your camera back in the old days, except that you wouldn’t even notice that it seemed like you’d shot more than 36 exposures on a roll. The D3 buffer keeps overwriting, and images keep showing up for review on the camera’s monitor.)
Hopefully, this will save you the embarrassment of one of those “D’oh!” moments on a shoot, where you sheepishly have to explain to the client that you have to reshoot everything because you forgot to put a memory card in your camera.
Price
One of the most stunning elements of the D3 when it was announced was its estimated selling price (ESP) of $4,999.95 (USD). While this is a lot of money, it is significantly less than the $7,999 ESP of Canon’s top of the line full-frame camera, the EOS-1Ds Mark III. To be fair, the two cameras seem targeted at different users – the Canon more toward studio photographers, while the Nikon D3 is more toward location photographers and photojournalists. Features and performance specs between the two are significantly different, so it’s a bit like comparing apples to oranges.
The $4,999.95 price of the D3 is the same as the price for Nikon’s D2x when it was released back in 2004. Factoring in the effects of inflation, the D3 is a significantly better value, and it far surpasses the capabilities of its predecessor.
While still in short supply today, the D3 is sold at premium prices by some retailers who have them in stock. Beware however, of online suppliers offering them at discounts hundreds or thousands of dollars below the $4,999.95 ESP. Most of these are bait-and-switch companies, who are likely to take your money and then tell you that the product is on extended back order while they hard sell you on something else. You are safest dealing only with authorized Nikon dealers.
For a lower priced option, consider the Nikon D300 with an ESP of $1,799.95. The D300 includes many of the new features of the D3 such as a high frame rate (6 fps), excellent low-light sensitivity, and similar 12+ megapixel resolution, but uses a smaller DX sensor.
Full-Frame FX Sensor and Lenses
For many photographers, the full-frame sensor on a digital Nikon is reason alone to consider the new camera. Again, this was the feature many of us waited eight years for (since the original announcement of the D1). The full-frame size of the CMOS sensor is one thing, but the tremendous light responsiveness is the second of a one-two punch.
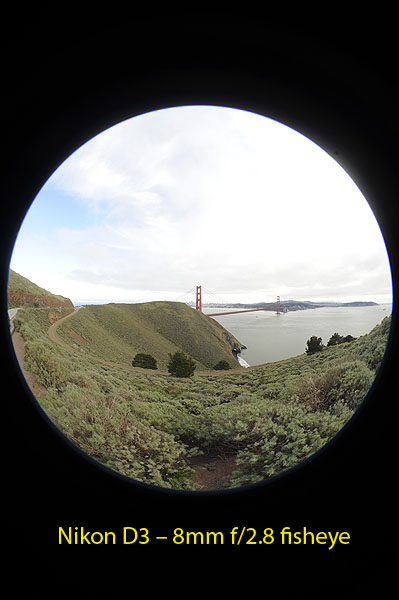
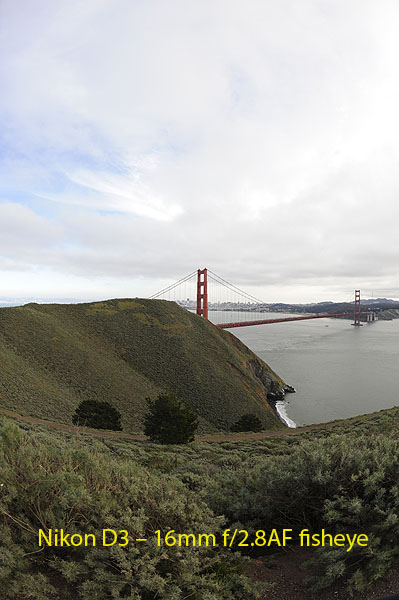
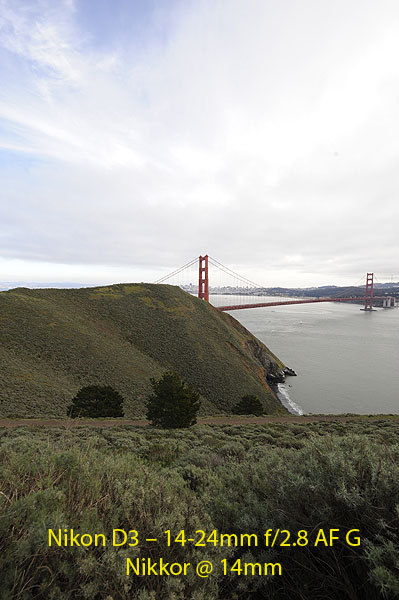
The full-frame FX format means panoramic VR photographers can once again use our ultra wide Nikkor lenses the way they were intended – with no cropping or focal length magnification factor. The entire image circle from an 8mm fisheye Nikkor is captured within the frame of the D3. Similarly, the full frame of a 16mm fisheye (close to 180° diagonal field of view) is recorded. The ultrawide 14mm, 15mm and 18mm Nikkor rectilinear lenses all capture almost identical fields of view as they do on traditional 35mm film cameras. Life is good again.
 |  |  |
The D3 will also accept DX lenses, such as the Nikkor 10.5mm fisheye and 12-24mm zoom. The default setting will automatically switch the camera to capture a DX-size portion of the frame when these lenses are mounted, but at a reduced resolution of 5.1 megapixels. You can override this by using the “Image area” menu and setting “Auto DX crop” to Off. This will utilize the full FX area of the sensor. However, you don’t really gain any resolution because you’re just recording out to the edge of the image circle plus the darkness beyond it. If you plan to do much shooting with DX lenses, you may be better off with the Nikon D300.
Using traditional lenses with the D3 for panoramic stitching is the same as using them with a 35mm camera. A full spherical panorama (360° horizontally x 180° vertically) can be captured with three or four shots with an 8mm fisheye (panning 120° or 90° between shots). With a 16mm full frame fisheye, you can capture the same spherical panorama with eight shots – six around (every 60°) plus zenith and nadir shots (straight up and straight down). Rectilinear lenses, such as the 14mm, 15mm, 18mm, 20mm and 24mm Nikkors, work extremely well, too, although more shots are required due to their narrower fields of view.
| Lens Fields of View – 35mm format | (Camera in portrait orientation) | |||
| Focal Length | Fov(y) & Fov(x) | Shots per 360° & pan increment | 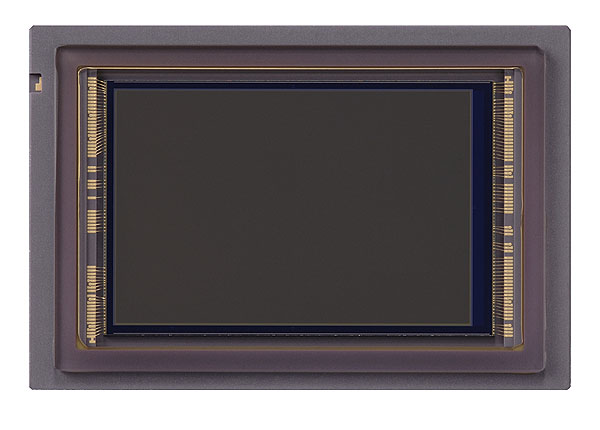 | |
| 8mm fisheye | 180° x 180° | 3 or 4 shots – 120° or 90° pan – full spherical | ||
| 16mm fisheye | 137° x 88° | 6 shots – 60° pan, plus zenith & nadir – full spherical | ||
| 14mm | 104° x 82° | 6 shots – 60° pan, 3 rows for spherical | ||
| 18mm | 90° x 68° | 8 shots – 45° pan, 3 rows for spherical | ||
| 24mm | 73° x 54° | 10 shots – 36° pan, 3 rows plus zenith & nadir for spherical | ||
| 35mm | 54° x 38° | 15 shots – 24° pan, NR for spherical | ||
| 50mm | 39° x 27° | 18 shots – 20° pan, NR for spherical | ||
| 85mm | 24° x 16° | 36 shots – 10° pan, NR for spherical | Nikon D3 CMOS sensor – 35mm frame size (FX format) |
We also had a chance to test the new Nikkor AF-S 14-24mm f/2.8G ED zoom lens with the D3. Click here for a Tech Note about Choosing a Lens for Panoramic VR.
Quality & Resolution
There are two somewhat similar menus on the D3 that can cause a bit of confusion. One is called “Quality” and the other is “Image Size.” Image “Quality” refers to the type(s) of files that the camera records, while “Image Size” refers to the resolution being captured.
Under the Quality choices, the D3 can be set to record NEF (Nikon’s proprietary Raw format), TIFF, JPEG (several compression levels), or combinations of NEF and JPEG. One of the advantages of having two CF card receptacles in the camera is that you can record RAW files on one card and JPEGs simultaneously on the other. More on this later.
 |  |  |
| JPEG (Fine) | Auto conversion from 12-bit NEF (Raw) via Adobe Camera Raw (ACR) – Photoshop CS3 | Auto conversion from 14-bit NEF (Raw) via Adobe Camera Raw (ACR) – Photoshop CS3 |
NEFs can be recorded at either 12-bit or 14-bit depth per channel. Most photographers won’t be able to tell the difference between the two looking at images side-by-side on screen, but 14-bit can be very useful if you’re doing a lot of manipulation or Photoshop work in post-production. However, there is significantly more color depth and information to work with in a Raw or NEF file than in any JPEG. This can be very handy when shooting subjects with high contrast or wide exposure latitudes. NEF will allow you to effectively adjust exposures after the fact up to two stops in each direction (over or under exposure).
NEFs take up more storage space than JPEGs, with 14-bit versions taking more than 12-bit ones. In my tests, a full-resolution JPEG (Fine quality) from the D3 averaged about 5 MB. A comparable 12-bit NEF was a little over 11 MB, while a 14-bit NEF was about 14 MB. Use these figures only for reference, as file sizes will vary somewhat depending on subject matter, lighting, and compression.
![]()
Resolution is determined by the Image Size settings on the D3. There are actually nine options available for this, but we’ll mainly consider the top three for now. The FX format’s image area is 36mm x 24mm. Image sizes (resolutions) within that are Large (4,256 x 2,832 pixels or 12.1 megapixels), Medium (3,184 x 2,120 pixels or 6.75 megapixels), and Small (2,128 x 1,416 pixels or 3 megapixels).
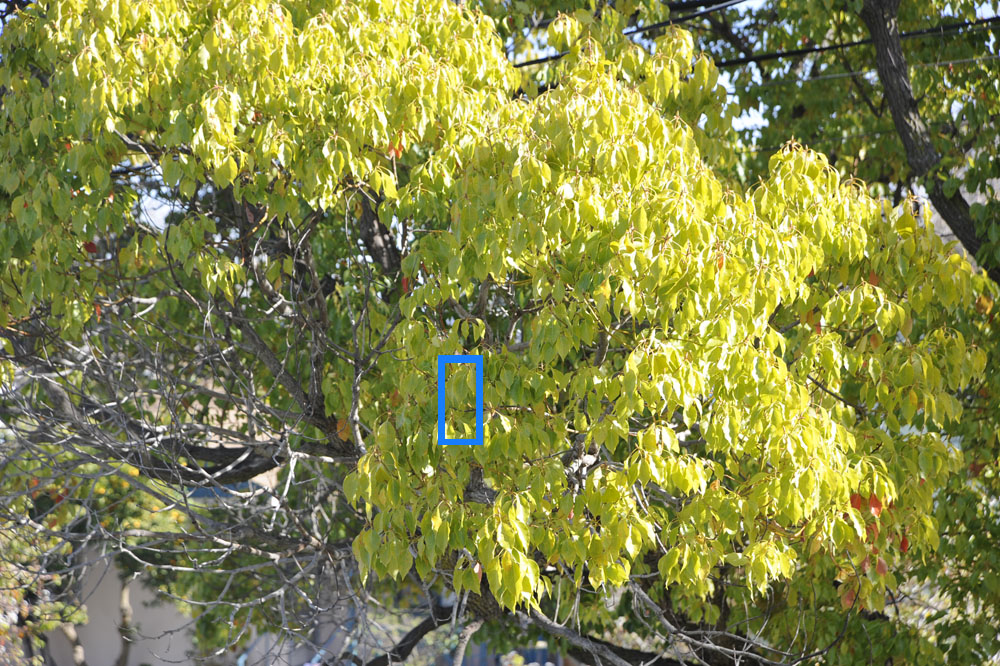 | Full frame (FX) JPEG of camphor tree leaves |
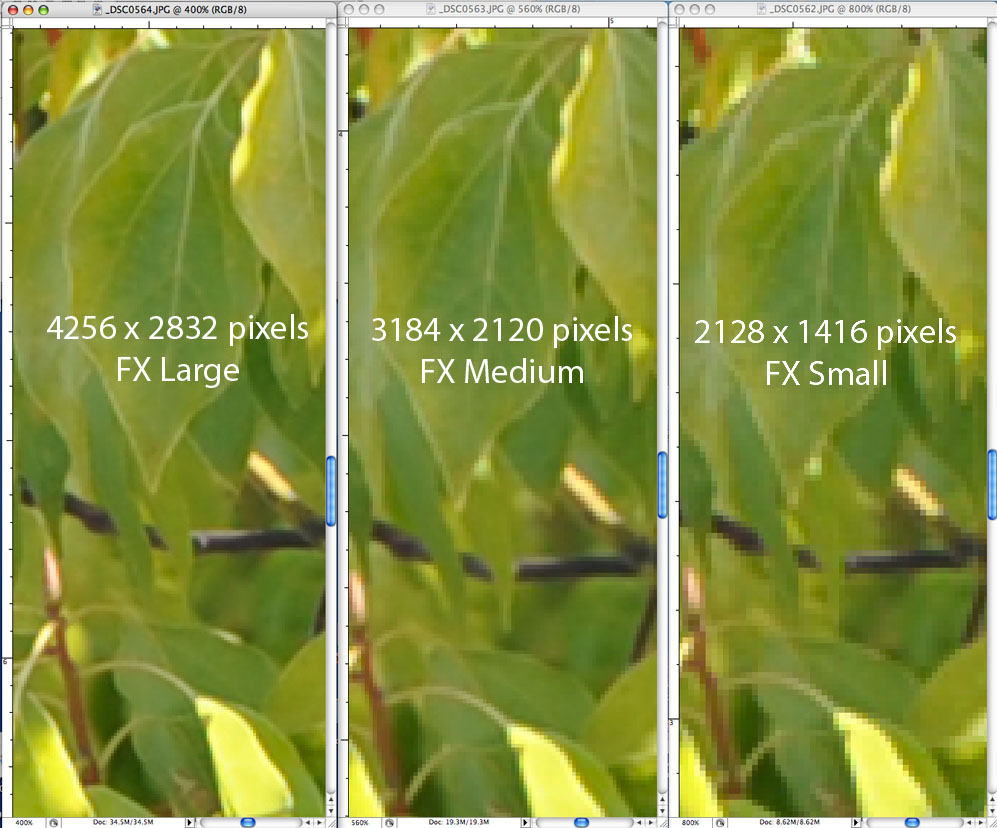 | Details comparison: Photoshop |
Image sizes can also be set for DX format (24mm x 16mm) at Large, Medium and Small, resolutions, as well as an intermediate 5:4 format (30mm x 24mm) at Large, Medium and Small resolutions. The 5:4 format is basically a cropped version of the FX frame, intended to match the aspect ratio of an 8”x10” print.
When using either the DX or 5:4 format settings, the edges of the viewfinder on the D3 are darkened with an appropriate mask to indicate the active capture area.
Personally, I had little desire to shoot in any other than the full-frame FX format.
| Nikon D3 | Image Sizes |  | |||
| Image Area | Option | Size (pixels) | |||
| Large | 4,256 x 2,832 | ||||
| FX format (36x24mm) | Medium | 3,184 x 2,120 | |||
| Small | 2,128 x 1,416 | ||||
| Large | 3,552 x 2,832 | ||||
| 5:4 format (30x24mm) | Medium | 2,656 x 2,120 | |||
| Small | 1,776 x 1,416 | ||||
| Large | 2,784 x 1,848 | ||||
| DX format (24x16mm) | Medium | 2,080 x 1,384 | |||
| Small | 1,392 x 920 |
Storage
Among the “nice touches” that Nikon added to the D3 are the dual compact flash (CF) card slots. Some earlier cameras accept two different memory cards, such as one CF and one SD, but this is the first time that Nikon has included two of the same type (the larger CF). This is a welcome change, as you no longer have to worry about carrying different card readers, or trying to keep track of which type of card goes where when you change them.
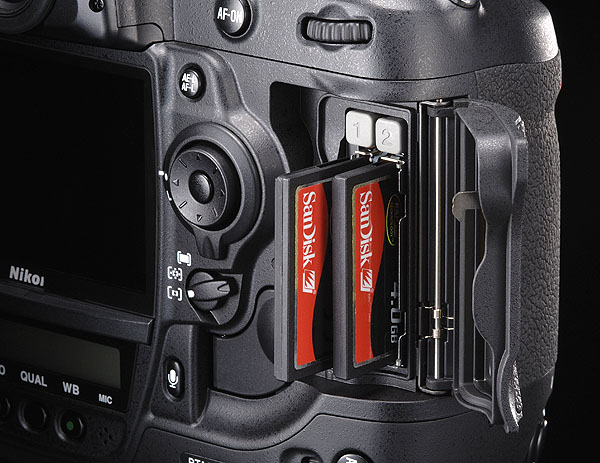 |
| The dual CF card slots on the Nikon D3 |
There are several options that you can choose for how the camera uses these two slots:
Overflow is the default, and this means that the card in slot 2 will automatically be used after the card in slot 1 is filled.
Backup means that every image will be written to both cards simultaneously, so one serves as a backup to the other.
If you’re shooting both Raw and JPEG, you can have the camera record Raw files to one card, and the JPEGs to the other. Or, you can have it record Raw and JPEG files sequentially to the same card, and then have slot 2 set to overflow. You can also save TIFF files.
I used the camera to shoot several sporting events, and found it most convenient to keep it set in Overflow mode. During a break in the action after the first card had been filled, I could swap it out with a new one, and still have the second in the camera ready for shooting if the action suddenly started up again. Once the second card was filled, the camera automatically switched back to the first card slot. The camera will stop shooting when both the cards in the slots are full (as long as you’ve reset the No Memory Card menu to Off, as described earlier).
The number of D3 images that can be stored on a single card will depend on the Quality, Image size, and compression settings, as well as your subject matter. However, in my tests, a 1 GB card averaged 60–80 Raw NEF images, or around 180–200 JPEGs (Fine) using the full-frame FX format.
With the prices of CF cards continuing to drop, it makes sense to purchase a handful of 4GB cards (currently around $50 or less in the U.S.) so you have capacity to shoot a few thousand images on a given assignment without having to download files in the field.
I found after a while that I preferred having the D3 set to capture both Raw NEF and JPEG (Fine), but to record them to the same card (using the second slot as “Overflow”). This was convenient for VR panoramas, as it allowed me to grab the JPEG files quickly for stitching in PTGUI or RealViz’s Stitcher, but I also had the Raw NEFs available to go back to if I needed to pull out further highlight or shadow details.
With most digital cameras, including the D3, it is important to turn the camera off before inserting or removing memory cards. It IS possible to lose all the data on a card by inserting or removing it with the camera’s power still on.
You also want to make sure that you don’t turn the camera off while it is still writing data to a card. It is tempting sometimes to turn the camera off quickly after shooting a sequence to conserve battery power. Doing this before the green “activity” light next to the card slots has turned off will mean that some of the images that are still in the camera’s buffer may not get written to the card. They will be lost permanently when the power shuts off. So make sure the camera has finished writing data to the card before shutting the power off.
Tremendous ISO Range
The heart of the D3 is its CMOS image sensor. In addition to its 35mm full frame size, it has a tremendous ISO range of 200 to 6400 (in 1/3, 1/2, or 1 stop increments). The images actually look quite good throughout most of these, both in normal daylight, as well as at slow, night time shutter speeds. This is a dream camera for low-light photography. VR photographers will love it for the same reasons that photojournalists do – you can get good quality images in low light at both faster shutter speeds and smaller apertures.
The D3 can also go beyond this “normal” ISO range to a low of 100 and to a high of 25,600. Yes, you read that right – 25,600 – or two full stops greater sensitivity than ISO 6400. Now, to be honest, there’s definite noise in the images at ISO 12,800 and 25,600, so you’re not likely to use them too often. But it’s handy to know that the capability is there if you need it.
I shot a night street scene which metered an exposure of 1/2 sec. @ f/4 at ISO 200. Certainly, this is reasonable to shoot on a tripod, but not hand held – and you won’t be stopping any action such as people walking or cars driving by at that exposure. However, at ISO 6400, you can shoot the same scene at 1/60 sec. And at ISO 25,600, you can go to 1/250 sec.
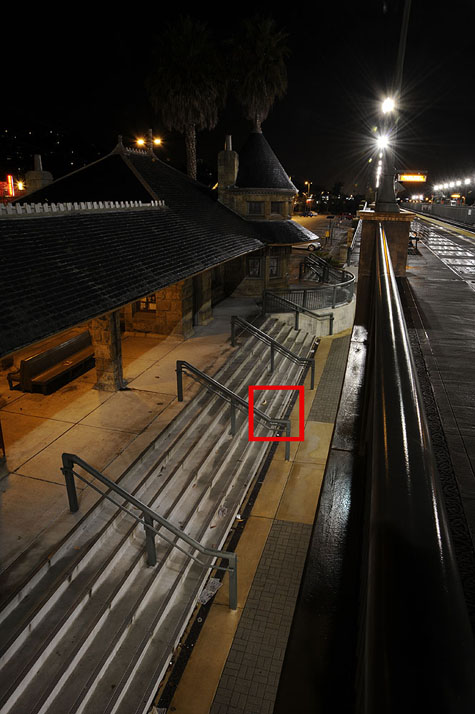 | 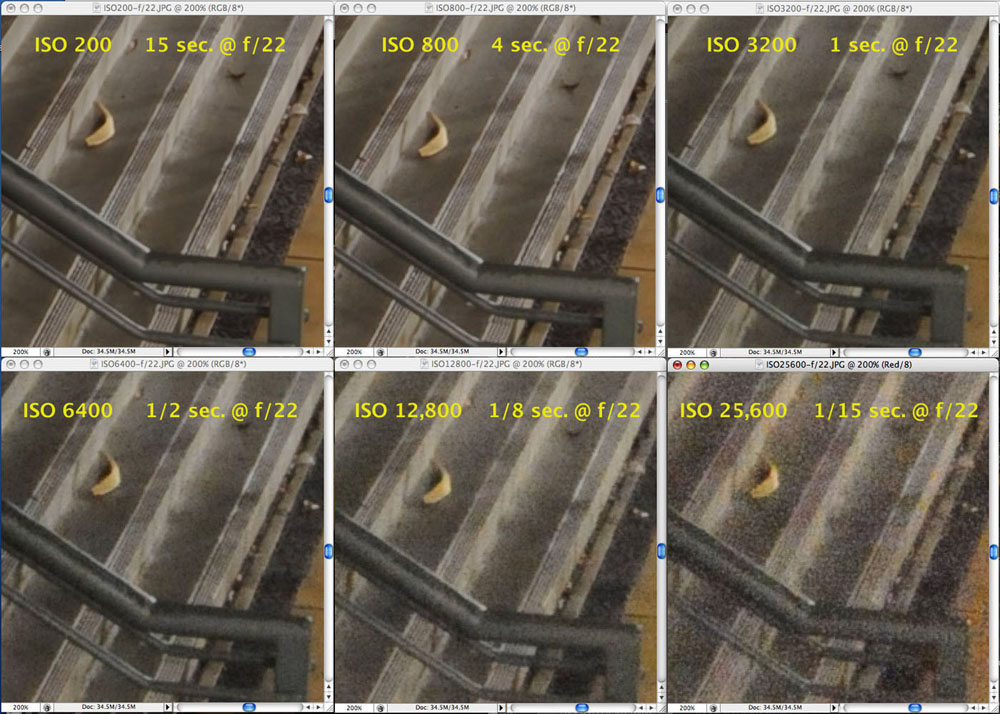 |
| The night scene at a train station | Enlarged results of different ISO settings with the Nikon D3 |
For the VR photographer, who most often shoots on a tripod or other support, higher ISO’s allow you to use smaller apertures in low light to maintain depth of field. ISO 3200 is really good on the D3, and 6400 is quite acceptable. I found ISO 1600 was excellent for outdoor sporting events. The images were so clean, and this allowed me to use extremely high shutter speeds to truly freeze the action.
Long exposures (up to 30 seconds) work quite well at lower ISO settings, but I find it necessary to turn on the Long Exposure Noise Reduction (NR) for these. When this option is selected, the camera captures a second dark exposure of the same duration internally, and then subtracts the difference as noise from the actual image you shot. This means that if you shoot a 15 second exposure, you’ll be unable to shoot another one for at least 15 more seconds while the camera does its matching dark exposure and noise reduction calculations. It’s very effective when you have the time, however. For shorter extended exposures, such as 1, 2, or 4 seconds, the time delay is barely noticeable, as you’re taking this much time simply to pan the camera to the next position in a panorama sequence. “Long exposure NR” – when selected – applies only to exposures of 1 second or longer.
Shooting Speed & Response Time
 |  | All right... 9 frames per second is fast. That’s nine 12.1 megapixel (34.5 MB) photographs every second! Unless you’re photographing bullets in flight, there aren’t too many subjects that you’ll need to be able to shoot any faster (although in DX format, you can shoot up to 11 fps with the D3). This rapid sequencing is great for sports and other action photography. However, it’s also great for the panoramic VR photographer consdering High Dynamic Range (HDR) sequences where you need to capture multiple bracketed exposures for each shot. Utilizing the Auto Bracket settings of the D3 with a high frame rate means you can quickly fire off a half dozen or more exposures before panning to the next increment in your panorama sequence. It makes HDR photography of moving subjects (at least, of s-l-o-w-l-y moving objects) somewhat feasible. Of course, a high frame rate doesn’t do much for the action photographer unless the response time between pressing the button and the camera’s taking the picture is also very short. For all intents and purposes, shutter lag is not an issue with the D3. If you miss a shot, it’s usually because your response was too slow. Response time with the D3 did not seem to be any different that it was with my Nikon F5. And the D3 is ready to shoot after being powered up in less time than it takes it to raise it to your eye. |
| Nine frames per second with the Nikon D3 |
![]()
Metering & Manual Control
The D3 is equipped with a very sophisticated exposure metering system with lots of options. Combining this with the camera’s exposure latitude, particularly in Raw mode, and it’s hard to shoot a poorly exposed photograph. There are a variety of different metering types available, depending upon what type of lens you have mounted on the front of the camera. Overall, these include various matrix metering methods, center-weighted and spot. Each has its own advantages in particular situations. For the most part however, photographers will probably find matrix metering a great choice for 95% of their work.
The Auto White Balance (AWB) ability of the camera is remarkable, although this is nothing new in digital cameras. You can shoot visually pleasing images that appear natural under just about any lighting conditions, including mixed lighting. Gone are the days when professional photographers agonized over a scene with expensive color meters and wratten gels to balance light sources to a fixed color temperature for film.
With the D3, you have your choice of Auto White Balance (which adjusts for color temperatures between 3,500°K and 8,000°K), plus a number of other presets, such as direct sunlight, shade, cloudy, flash, seven different fluorescent types (from sodium vapor to mercury vapor), and of course, incandescent (tungsten). However, you can also set the color temperature manually between 2,500°K and 10,000°K.
Further still, you can set white balance (WB) from a neutral gray or white card reading, store up to seven of your own custom settings, or even copy an existing WB setting from an image previously stored on a memory card.
The ability to lock white balance and exposure settings (aperture and shutter speed) are critical for the VR photographer. It is important to maintain all these settings among shots in a series for both panoramic stitching and object photography.
The D3 allows for this, either via Manual exposure mode or via exposure and WB lock buttons. Personally, I prefer using Manual exposure, because removing your finger from the exposure lock button lets the camera reset its exposure between shots. Of course, all lenses can be set to focus manually on the D3 simply by turning a switch on the front of the camera to Manual focus.
I find it handy to let the camera determine initial automatic settings for exposure, white balance and focus when shooting a panorama. I take note of these, and then switch everything to manual and match each of the settings for the scene I’m shooting. I trust the camera’s technology to get exposure, white balance and focus right, but I like setting it all under manual control in order to make sure that the camera doesn’t subtly adjust any of these during the shooting sequence. Consistency between shots is a key to successful VR photography, and the D3 will certainly deliver it, as long as you instruct it to "stop thinking" for a while via manual control.
I was very impressed with the exposure consistency of the camera, even with Nikon’s new G lenses (these lenses do not have an external aperture ring – their apertures can only be controlled electronically via the camera and its command wheel). I was worried because there was no mechanical ring to fix the aperture with, and that its electronic positioning might vary slightly between shots preventing consistent exposures for critical object photography or time-lapse work. However, my minimal testing with the 14-24mm f/2.8G Nikkor revealed little, if any, difference in exposure, even when the camera was shut of and turned back on between shots.
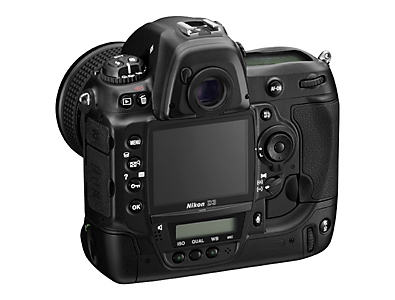
Display
Another of the features making the D3 such a joy to use is the 3” color display on the back of the camera. This is actually a polysilicon TFT LCD monitor, equivalent in resolution to a 640x480 VGA screen. It is bright (you can see it fairly well even in bright sunlight), and everything looks gorgeous on it. It’s large enough that you can read the menus clearly, and is excellent for reviewing details of images you’ve already shot, particularly with easy zoom and navigation controls. It has a 170° viewing angle, so two or more people at a time can see it. It’s very easy to get sidetracked looking at your images and their histograms on this beautiful screen, and miss out on things that you should be shooting in front of the camera.
This display is also used for two brand new features never before seen on a Nikon D-SLR – Live View and Virtual Horizon.
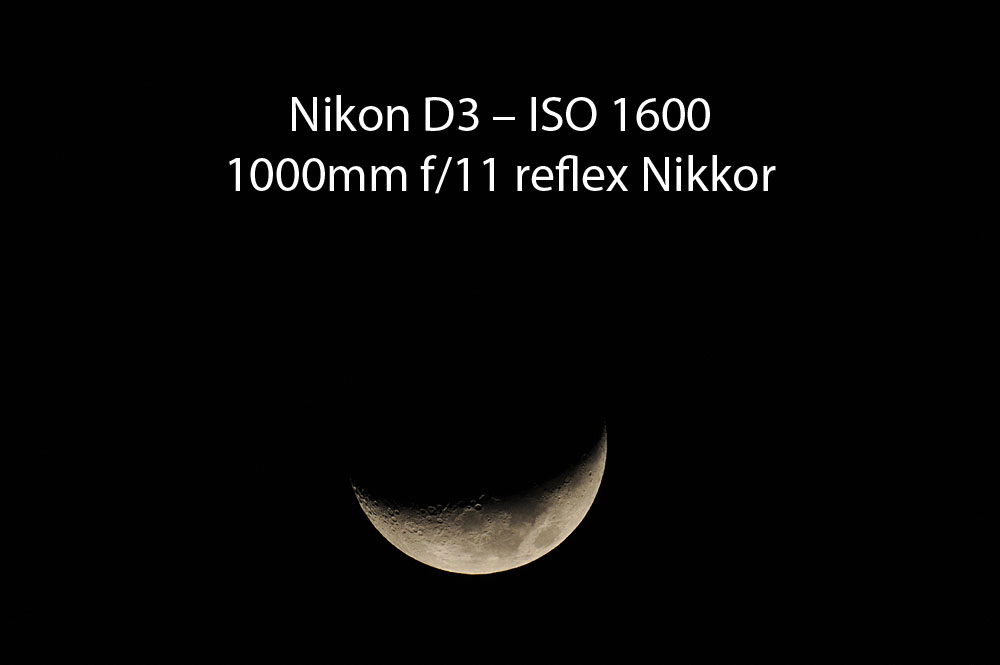
Live View provides exactly what its name describes – a live view of what is being seen by the camera’s image sensor. Live View has two modes, one for shooting on a tripod, and the other for hand held. It’s tremendously valuable for framing your shot when you can’t necessarily get your eye to the viewfinder, and it can also be a critical focusing aid. You use the same controls to zoom in on the part of the Live View image that you want to see as you do for reviewing recorded photos. I used this when trying to focus a manual 1000mm reflex Nikkor on the moon one night. Even with the exceptionally bright and clear D3 viewfinder, it’s still hard to get perfect focus with such a long lens and small subject in the frame. Using Live View and zooming in to the full resolution of the sensor, I was able to focus perfectly.
 | 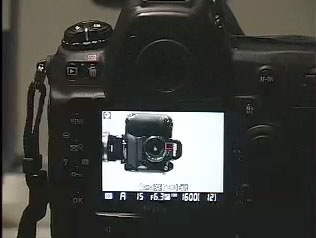 Live View – Nikon D3 |
Virtual Horizon is one of those features you’ll think you probably don’t need until you try it. Basically, it’s a leveling mechanism for the roll axis of the camera. It looks similar to the artificial horizon found in aircraft cockpits. The Virtual Horizon display is quite responsive. When you DO get the camera level, the reference lines turn green. This helps you to level the camera (at least on this one axis) by looking at the display, rather than through the viewfinder or at a supplementary bubble level attached to the hot shoe. Virtual Horizon works even when the camera is tilted up or down, unless near vertical.
You can also use the light meter display inside the viewfinder as a Virtual Horizon indicator by programming the camera’s Function button accordingly (this is a separate button on the front of the camera – near the depth of field preview – which you can easily press with a finger while the camera is up to your eye.)
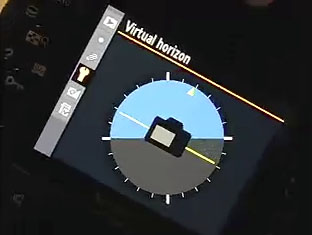 Virtual Horizon | 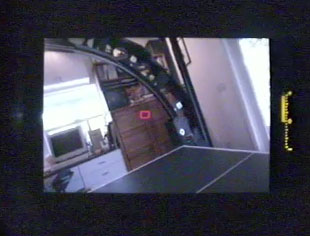 Virtual Horizon |
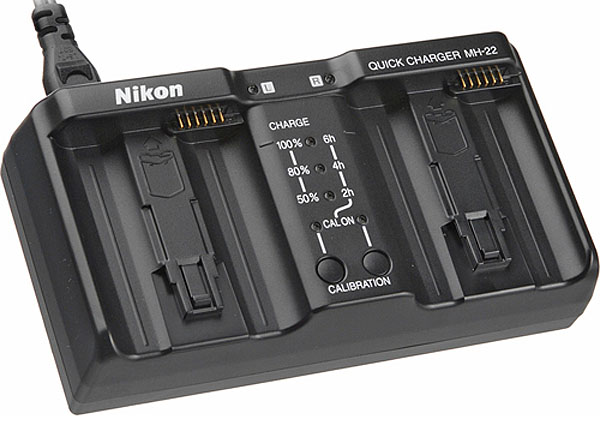 | Battery Life & Power Consumption I didn’t have a chance to test the camera through an extended shoot, such as one where it’s powered up and in constant use all day long. However, I did use it over many shorter shoots on different days, and only recharged the single battery Nikon provided twice in almost three weeks. I was able to get through several half-day shoots starting out with a less-than-fully-charged battery, and still have some battery life left afterward. These involved lots of use of the beautiful rear display to review my work as I was shooting, as well as to make regular menu adjustments. The D3 uses Nikon’s EN-EL4 and EN-EL4a batteries – the same ones used by the D2h and D2x cameras. Included when you buy the camera is an MH-22 Quick Charger, which has two battery receptacles. (Unfortunately, it only charges one battery at a time, but it will automatically switch to charging the second after the first has finished.) A fully discharged EL-EN4a battery will take close to two and a half hours to completely recharge, while the older EL-EN4 battery will take about an hour and a half. (The newer EN-EL4a is rated at 2500 mAh, compared to 1900mAh for the older EL-EN4.) |
| NH-22 Dual Battery Charger for EN-EL4 and EN-EL4a Batteries |
![]()
Audio Recording
This is one of those little features that you don’t really think too much about until you use it. The D3, like a number of other pro D-SLRs, has a small microphone and speaker included, so you can record up to 1-minute of audio to accompany each image. This might be your own commentary, shooting notes, or better yet, ambient sounds from the location or environment you’re shooting.
The microphone is actually quite good, and each audio clip is recorded as a .wav file, so it can be easily incorporated into QTVR movies or added to a web page as background sound. This feature is a nice touch, and might save you from having to carry a separate audio deck and microphone for capturing wild sound on location.
| Nikon D3 location audio recording sample Stanford University Chapel |
![]()
What's Missing?
To be honest, not much is missing from this camera. Nikon has done a great job in creating a well-rounded, professional tool. That’s not to say that the D3 is the last camera you’ll ever want to buy, or that you won’t wind up having to spend more money on related accessories, but there is very little missing when you open the box relative to other professional D-SLRs.
For a limited time, Nikon is including its Capture NX software ($149.95 value) with new D3 purchases. This may only last another month or two. While most pro photographers I’ve spoken with tend to prefer Photoshop and the latest version of Adobe Camera Raw (ACR) to import their NEF (Raw) files, Capture NX does offer Nikon’s own proprietary Raw conversion. It also offers some specific lens corrections, such as barrel distortion removal. This is particularly handy for “correcting” Nikon’s new 14-24mm zoom lens images shot at its widest focal lengths. For more on this, see the Tech Note on Choosing a Lens for Panoramic VR. Some panoramic VR stitching applications require properly corrected source images with all barrel distortion removed.
Sport Finder – There are times when it is impractical to have the camera’s viewfinder close enough to your eye for you to see through it effectively. Examples include shooting in an underwater housing (where you have the both the housing and your dive mask keeping your eye at a distance), and shooting certain types of sports or action, where your safety depends on keeping your camera slightly away from your eye so your peripheral vision isn’t blocked. When shooting macro work, where your camera is low to the ground or on a vertical copy stand, it is often difficult to position yourself so you can look through the normal viewfinder. For these reasons, Nikon has offered specialized Sport Finders and right angle finders for their 35mm film cameras.
With the addition of a monitor on the back of the camera and the new Live View feature, the need for these accessory finders has been minimized. However, it is not completely gone. There may be some instances, such as low-to-ground shooting, where you cannot easily position your camera or your body to see either through the viewfinder or the display. Also, for the sports where you don’t want the camera so close to your eye, you may not also want to be watching everything on a small video display. The newer underwater housings being manufactured by third party vendors such as Aquatica actually rely on the use of the camera’s display and Live View. (Of course, the Aquatica housing for the D3 is expected to retail for about $3,800 (US) – close to the price of the D3 itself.)
There is no sport finder offered for the D3. In fact, the viewfinder and pentaprism are fully integrated into the body of the camera, so there’s not really even the possibility for one being offered in the future. Nikon does offer a DR-4 Right Angle attachment that attaches to the existing viewfinder eyepiece, however. The DR-5 eyepiece magnifier (2x) can also be useful for both macro and copy work, and it can be used in combination with the DR-4 right angle attachment, according to Nikon literature.
Architectural Grid – Many of Nikon’s lower-priced D-SLRs have the ability to turn on an architectural grid in the viewfinder through a simple menu selection. The D3 does not have this feature. If you want an architectural grid in the viewfinder (very handy when you want to squarely align the camera with buildings, etc.), then you’ll need to purchase and install the separate Type E screen for the D3. This retails for about $35. It can be user-installed. However, you can’t simply turn it on and off like you can with other Nikon D-SLRs.
LCD Screen Protector – Unlike other Nikon D-SLRs, the D3 doesn’t come with a plastic protector for that beautiful 3” display on the back of the camera. It’s been reported that this screen has a very durable tempered glass covering, which is quite scratch resistant. It cleans very nicely with a microfiber cloth. Most D3 bodies haven’t been in heavy service long enough to really know for sure how well these screens will hold up over time without a protector, so we’ll have to wait and see. There are third parties that have already announced screen protectors for the D3. One online site suggested that the Nikon screen protector that ships with the D300 should also fit on the D3, since the screens are the same.
Yet this display is really so beautiful that it seems a shame to cover it up with a piece of cheap plastic – a lot like putting a cheap filter over a high quality lens. Sure, you’re offering some protection to the glass, but at what cost to image or viewing quality? Still, if the display screen were to crack after being hit by something hard, you might have wished you’d covered it.
GPS – The D3 allows for the input of GPS information, which can be written into the EXIF data for each image shot. However, this requires a special Nikon adapter cable and an external GPS unit with its own cable. This makes GPS recording somewhat cumbersome in the field because of the multiple tethered wires and hand held GPS unit all connected to the camera. Panoramic VR photographers very much value the ability to record GPS location data (latitude, longitude, altitude, etc.) effectively with their images.
What we’d really like is a small GPS receiver that would attach directly to the hot shoe on top of the camera with a single short cable that would plug into the proper camera receptacle. Unfortunately, Nikon is not in the business of making GPS units, so it’s unlikely that we’ll see anything directly from them in the immediate future.
However, on the first day of the January MacWorld in San Francisco, I spoke with one of the reps at the Garmin booth about the need for such a mini GPS receiver. She responded that about a dozen other people had already asked her about the same thing that morning, so it appears there’s a consumer demand. She said Garmin would likely consider producing something like this in the future.
Since this review was published, a reader from Belgium offered the following link for a company in Hong Kong (Dawn Technology Ltd.) that is already offering a mini-GPS unit specifically for Nikon D-SLRs.
Note: In August, 2008, Nikon announced its GP-1, a small hot-shoe or camera strap mounted GPS unit that can provide latitude, longitude, altitude and time input directly into the D3 and other newer Nikon digital cameras. Pricing and availability details were not yet available, but this will likely become a desired accessory by many.
AutoFocus Points – The D3 boasts 51 user selectable autofocus points in its viewfinder. This system, combined with Nikkor’s AF lenses, makes for a very fast and accurate autofocus system.
Unfortunately, all 51 of these AF points are positioned within the middle third of the frame, so any time you have a subject that doesn’t appear at least partly near the center of the frame, autofocus may not register properly. It would be nice if some of the camera’s user-selectable AF points could be positioned closer to the edges of the frame so that autofocus with compositions beyond just those following the rule of thirds could be used.
While you can currently reframe the composition and use the focus lock button as you recompose for these situations, this is often inconvenient, especially when the camera is mounted on a tripod.
Long Exposures – The D3 does have a Bulb setting among its shutter speed selections. However, long exposures measured in minutes or hours, rather than just seconds or fractions thereof, remain outside of the practical limits for most digital cameras due to the high noise levels that result from very long exposures on digital sensors. This is one of the few remaining areas where traditional film remains a better choice than digital.
Other Costs to Consider When Purchasing a D3
In addition to the $4,999.95 purchase price of a new D3, there will be additional costs to consider for the peripherals and accessories you might need. These include:
Extra camera batteries. The D3 uses Nikon EN-EL4a or EN-EL4 batteries (same as the D2 series of cameras). You will want at least one, and possibly two extras. The EN-EL4a has a larger capacity that the older EN-EL4. Each EN-EL4a retails at B&H Photo in New York for $119.95.
Type E focusing screen for D3 (with architectural reference grids) retails at B&H for $32.95.
Electronic cable release. The D3 does not accept the traditional mechanical plunger cable releases that cameras have used for so long (even including Nikon’s D100). So if you don’t already have one, you’ll need a 10-pin electronic remote release. Nikon’s basic MC-30 retails at B&H for $54.95, while the more advanced ML-3 (with intervalometer and other controls) sells for $174.95. Note that the D3 has an intervalometer already built in. Third party cable releases, such as those from Dot Line, run between $35 and $40. Many deals for these can be found by the careful eBay shopper.
The D3 comes with a Nikon MH-22 Dual Quick Charger ($239.95 at B&H). However, if you are going to be shooting in remote locations with only limited periods to charge batteries, you may need one or more additional chargers. Remember that the MH-22 holds two batteries, but only charges one at a time in sequence.
Sensor Cleaner – Nikon recommends that the camera be sent to an authorized Nikon repair center for cleaning of the Low-Pass filter that covers the image sensor. However, this gets expensive. Nikon acknowledges that photographers may want to do it themselves, so they include instructions in the user’s manual for blowing dust off the filter. There are third party products for cleaning the filter that incorporate special wipes and liquids, but this is done at your own risk. Nikon recommends that regular service (in addition to low-pass filter cleaning, as needed) be done every three to five years.
Storage Media – You will probably want to purchase a few Compact Flash (CF) data cards. The 2GB and 4GB capacities will likely be the smallest you want to use, especially if you plan to shoot in Raw (NEF) mode. At current prices, plan to spend $100 - $200 on these, if you don’t already own them. Nikon recommends SanDisk and Lexar Media brands.
Software – If you plan to shoot in Raw format, you will either need Nikon’s proprietary Capture NX software, or one of the Raw converters that come with Adobe Photoshop, Lightroom, or Apple’s Aperture. In the case of Adobe Camera Raw (ACR), only the latest versions include support for the NEF files from the D3, and these ACR plug-ins only work with Photoshop CS3 (or later). So you might need to consider upgrade costs for Photoshop, Lightroom, or Aperture, depending upon which application(s) you use regularly.
Computer Processing – Larger digital image files, and more of them, often result in a need to upgrade your computer memory, or even the computer itself. Keep this in mind when you upgrade to a camera like the D3, which creates larger image files (and does so in potentially high volumes at up to 9 frames per second).
Digital Archiving – After you shoot and post produce all these images, stitched panoramas, and other multimedia elements, you’re going to need some sort of effective system for archiving and storing them so you’ll have ready access to them again in the future. Simply burning CDs or DVDs of all this data may not be so effective any more. Explore the various methods for post-production workflow, backups, and archiving ahead of time. Set up your own system BEFORE you wind up with terabytes of digital data in a jumbled, non-cataloged mess. For links to a number of excellent information resources, go to the American Society of Media Photographer’s web site at: http://www.asmp.org/commerce/digital.php
![]()
Update: Comparison of D3 and D700 camera models
 |  |
| Nikon D3 | Nikon D700 |
![]()
A little less than a year after announcing the D3, Nikon announced the D700, its first "prosumer" digital SLR to feature the same full-sized FX sensor that is found in the D3. While we don't have any inside information about future products from Nikon, it would appear that the D700 is probably the first of many DSLRs coming from Nikon to feature the full 35mm frame coverage at a more reasonable price than Nikon's traditional pro models. Nikon may also continue to produce future DX models with their smaller sensors (perhaps a D400 or D500, and D90), but I would expect more empahsis ahead on professional models with the FX format -- perhaps with higher resolutions, such as a D3x or D4, as well as D800 and D900 prosumer models.
VR photographers probably want to know what the differences between the two full-sized sensor Nikon models are. The D700 has an estimated selling price (ESP) of $2,999.95 (US) -- a 40% discount from the $4,999.95 for the D3. While we have not had a chance to physically test the newer D700 yet, we have looked at the specifications provided by Nikon, and have noted those most likely to be of interest to VR photographers in the chart below.
Official Nikon product brochures can be downloaded for both cameras at the following:
| Nikon D3 | http://www.nikonusa.com/Assets/Digital-SLR/25434-Nikon-D3/PDF/D3_brochure.pdf |
| Nikon D700 | http://www.nikonusa.com/Assets/Digital-SLR/25444-Nikon-D700/PDF/25444_D700_brochure.pdf |
| Comparison Guide for current Nikon DSLRs | http://www.nikonusa.com/Assets/Common-Assets/PDF/DSLR_Compare2008.pdf |
Both cameras feature the same 12.1 megapixel full-frame CMOS sensor, so they both provide full coverage with your Nikkor lenses -- no magnification factor. That means the fields of view (fov) coverage that you get with a 16mm or 18mm Nikkor will be almost identical to what you'd get with these same lenses on a 35mm Nikon. Additionally, you get the same range of ISO sensitivity (100 to 25,600) and exceptional low light performance from both cameras.
The D700 offers a new Integrated Dust Reduction System that the D3 doesn't have, in order to help keep the image sensor clean. It also features a correction to reduce chromatic aberration. Live View and Virtual Horizon are both offered on the D700. Improving on the D3, they can both be displayed on the camera's screen at the same time. The D700 also offers an integrated pop-up flash above the camera's viewfinder, which the D3 does not. The back of the camera, including various function buttons and some menus, are also different for the cameras.
The D700 has a slower maximum shooting speed, offering only 5 frames per second (fps) compared to the 9 and 11fps for the D3. However, this can be increased to about 8 fps with addition of the optional MB-D10 Multi-Power Battery Grip ($239.95). Adding the MB-D10 actually makes the D700 larger in size than the D3, however. The D700 uses the same EN-EL3 batteries as the D100, D200 and D300, whereas the D3 uses the EN-EL4 series of batteries common to the older Nikon pro D2 and D2x cameras. The D700 (without the MB-D10) is smaller and lighter than the D3.
Missing from the D700 are the dual compact flash (CF) drives (the D700 only has one) and audio recording capability -- a tool that is great for capturing ambient sounds for VR panorama and multimedia production. Nikon's pro cameras, such as the D3, have always featured an optical viewfinder that provides a full 100% coverage of the image area, so what you see in the viewfinder is supposed to be identical to what is captured by the image sensor. With Nikon's prosumer cameras, including the D700, this coverage is slightly less (about 95%), so you'll miss just a little bit of what gets captured by the camera around the edges when looking through the viewfinder.
![]()
| Feature | Nikon D3 | Nikon D700 |
| Sensor size | CMOS full frame (FX format) 36.0 x 23.9mm | |
| Resolution | 12.1 megapixels (max) | |
| ISO range | 200 – 6400 (normal) (100 – 25,600 extended) in 1/3 stop increments | |
| Maximum image size | 4,256 x 2,832 pixels | |
| Accepts DX lenses? | Yes | |
| Captures DX format, if desired? | Yes | |
| File formats available | NEF (Raw) 12 or 14 bit TIFF JPG NEF + RAW | |
| Shutter speed range | 1/8000 sec. – 30 sec. in 1/3 stop increments | |
| Monitor | 3" diag., 920,000 dot VGA, 170° viewing angle | |
| Live View | Yes | Yes (can combine with Virtual Horizon) |
| Virtual Horizon | Yes | Yes (can combine with Live View) |
| | ||
| Sensor self-cleaning (dust reduction)? | No | Yes |
| Storage media | Compact Flash (Types 1 and 2), Microdrives | Compact Flash (Type 1 only) |
| CF card slots | Two | One |
| Focusing screen | Type B BriteView (Type E with architectural grid is self-installed accessory) | Type B BriteView (with architectural grid lines turned on/off in camera) |
| Shutter actuation rating | 300,000 | 150,000 |
| Capture speed (fps) | 9–11 fps | 5 fps (8 fps w/optional MB-D10) |
| Voice memo (audio record capability)? | Yes | No |
| Weight | 2.7 lbs (without battery) | 2.2 lbs (without battery) |
| Battery | EN-EL4a or EN-EL4 (same as D2, D2h, D2x) | EN-EL3e (same as D100, D200, and D300) With MB-D10 Multi Power Battery Pack, can also accept EN-EL4 or EN-EL4a battery with BL-3 battery chamber cover, or 8 AA alkaline, NiMH, lithium, or nickel-manganese batteries |
| Estimated Selling Price (ESP) | $4,999.95 (US) | $2,999.95 (US) |
![]()