 | Choosing a Lens for Panoramic VR |
By Scott Highton for Virtual Reality Photography (www.vrphotography.com)
March, 2008
In 1994, when Apple first released QuickTime VR, photographers had very little choice in what camera and lens types they could use for panoramic VR. Shooting on 35mm film was the only real option, and Nikon’s manual focus 15mm f/3.5 ultra wide lens was the lens of choice, even though it cost close to $2,000. QTVR Authoring software required that source images for panoramic stitching be rectilinearly corrected (so straight lines in the scene appeared as straight lines on film), and the 15mm Nikkor was one of the widest lenses available of this type. The wider the lens, the more vertical coverage you could get in your panorama, since stitching was limited to a single row of images.
For many years, this remained the case, even as newer stitching applications came on to the market. IPIX followed Apple’s release of QTVR a year or two later with their proprietary software, which assembled two hemispheric fisheye images into a “PhotoBubble,” or complete spherical panorama. These were initially also shot on 35mm film using another expensive Nikon lens – the Nikkor 8mm f/2.8 fisheye. IPIX aggressively protected their patents, and for years successfully prevented most others from releasing stitching software that could assemble panoramic images from any type of fisheye lens capture methods.
As a result of their aggressive legal tactics, IPIX generated considerable ill will in the VR community. Ultimately, the company went out of business in 2006. The benefit since then has been that panoramic software developers have expanded the lens choices and capabilities of their stitching applications. Today, photographers choosing a lens for stitched panoramic photography have a wide variety of options.
Lens Types
There are three primary types of lenses that panoramic VR photographers tend to prefer – the true fisheye, the full frame fisheye, and the ultra wide rectilinear.
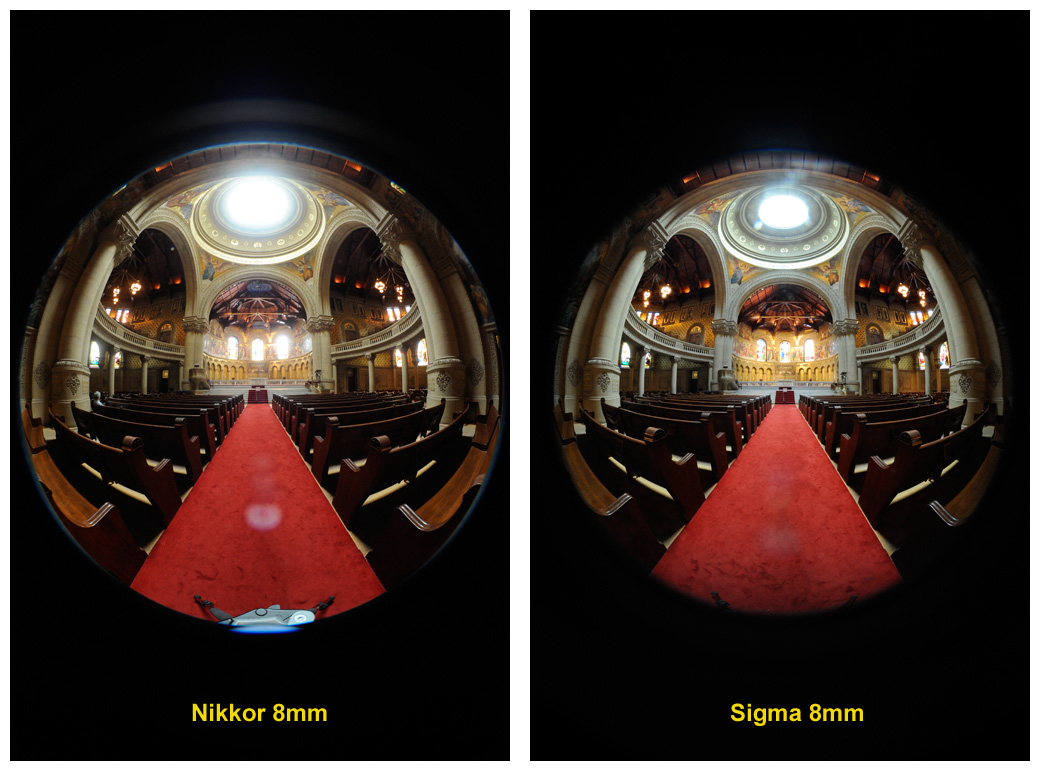
A true fisheye renders a hemispheric view in a circular area fully within the frame coverage of the camera. Photographs taken with these lenses appear as round images, surrounded by a black, or unexposed remainder of the frame. The views are generally considered “distorted” as the lenses render straight lines in a scene (such as building and architectural edges) as curved, unless they happen to align with the vertical and horizontal centers of the lens. The field of view (fov) for these lenses is 180° or greater, both horizontally and vertically. Focal lengths in the 35mm (or full frame) format are usually 8mm or less.
A full frame fisheye provides a similar circular perspective as a true fisheye, but the image circle projected is large enough to completely fill the frame of the camera. This means that there is no black or unexposed border. The camera actually crops the edges of the image circle. The resulting field of view is close to 180°, but only across the diagonal of the image. Vertical and horizontal fields of view are significantly less. Focal lengths (in 35mm format) are usually in the 14mm to 16mm range.
An ultra wide rectilinear lens is one that displays no barrel-type or fisheye distortion in the images it projects onto the sensor or film plane. Straight lines in the scene are rendered as straight lines in the recorded images due to the rectilinear correction of these lenses. Their main disadvantage is that there can be significant fall off in light levels near the edges and corners, due to the larger angles and distances light rays are directed. The wider the focal length, the greater the light fall off can be. This can mean inconsistent exposure between the portions of adjacent images where stitching occurs, and can result in banding or other problems that need correction in post production. Focal lengths (35mm format) tend to be between 13mm and 21mm.
 |
Other lens types can also be used for panorama stitching, but are less common because their longer focal lengths result in smaller fields of view – thus requiring smaller pan increments between shots and more images overall to achieve the same panoramic coverage. These can be used for photographing very high resolution (gigapixel) panoramas, however. Included types are traditional wide angle (24mm – 35mm), normal (50mm – 70mm), telephoto (80mm – 300mm), and even super telephoto (400mm or more).
Lens Coverage: Field of View (fov)
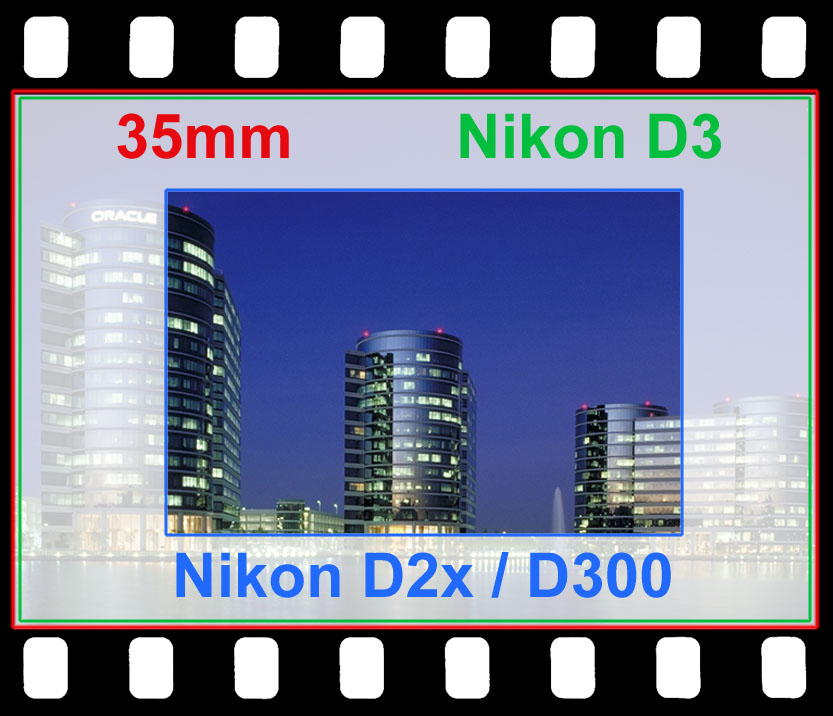
Until recently, most digital cameras, including professional D-SLRs, had image sensors that were significantly smaller than the traditional 35mm film frame. This meant that the images they captured using a given focal length lens were cropped relative to what would have been included in a 35mm film frame. The result is an effective magnification factor. Most pro D-SLRs today have imaging sensors that are about 2/3 the size of the 35mm frame, so they have a magnification factor of 1.5x. That means when you install an 18mm lens, you wind up with coverage similar to that of a 28mm lens on a 35mm camera (18mm x 1.5 = 27mm equivalent).
Fortunately, full-frame D-SLRs are now becoming more common. Canon has several of these in their pro camera lineup, and since November of 2007, Nikon also offers one with its new D3. Nikon calls their full-frame sensor the FX format, while the smaller format (1.5x) found in most D-SLRs is known as DX. When you see a DX designation on a lens, such as the Nikkor DX fisheye 10.5mm, or the Nikkor DX zoom 12-24mm, it means that the lens is designed to only cover the area of the smaller DX camera sensors.
The Nikkor DX 10.5mm fisheye was designed to give similar fov coverage on the DX format as the Nikkor 16mm full frame fisheye does on the 35mm (or FX) format. Similarly the Nikkor DX zoom 12-24mm gives similar coverage to an 18-35mm lens.
Consumer digital cameras often have image sensors that are even smaller than the reduced DX format. However, manufacturers of these cameras generally provide 35mm format equivalent references for the focal lengths of their accompanying lenses.
 |
| Relative sizes and areas of 35mm film & digital sensors |
When shooting panoramic sequences for stitching, knowing what the field of view for your camera and lens combination is critical to determining your pan increments between each shot. For more information, see the Tech Note on Fields of View and Pan Increments.
Choosing a Lens
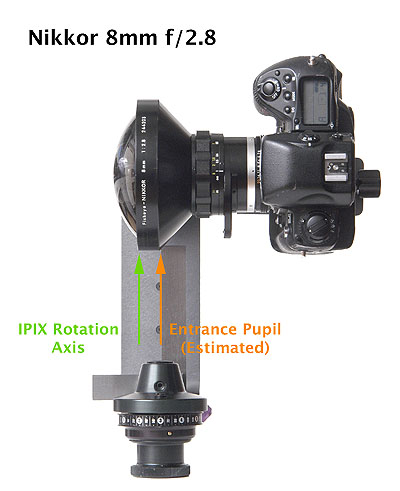
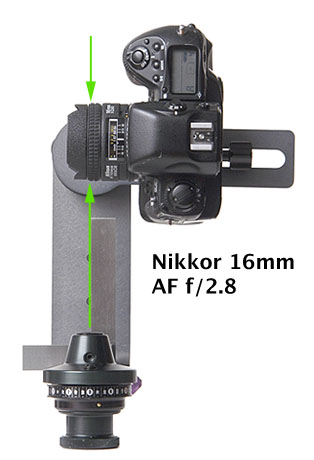
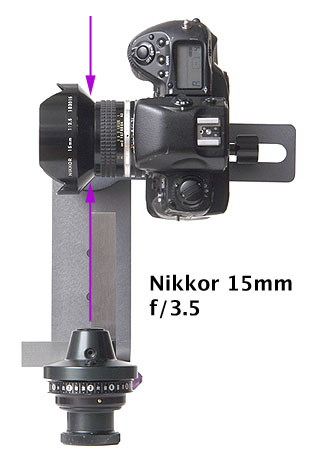
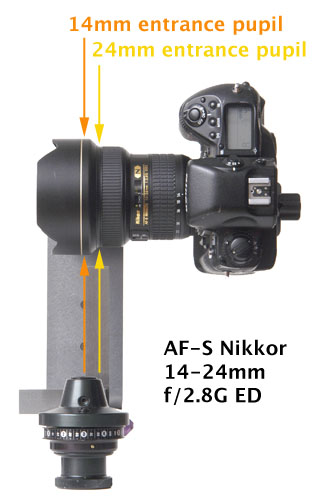
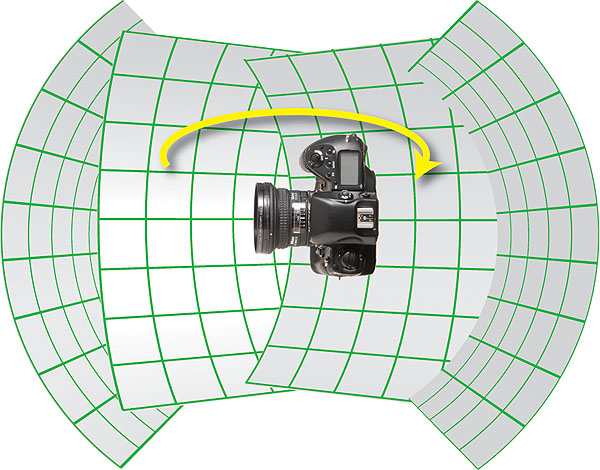
I’ve found that I prefer being able to use one camera and lens combination for the majority of my panoramic VR shooting. This keeps things simple in terms of packing equipment and having a pan head properly (and consistently) aligned for rotation around the entrance pupil of the lens. (For more, see the Tech Note on Entrance Pupil Alignment.) Finding the best combination of camera and lens for this has taken many years.
I recommend that the first choice a panoramic VR photographer should make is the stitching software they plan to use. This will dictate what types of lens choices one has. For example, PTGUI ( http://www.ptgui.com ) and RealViz’s Stitcher ( http://stitcher.realviz.com ) allow for the stitching of fisheye images, while a number of other applications do not. Getting familiar with the capabilities of your preferred software before purchasing a lens for your VR work will better help you make a lens decision.
I have long preferred ultra wide rectilinear lenses for panoramic VR – in particular the Nikkor 18mm f/2.8. I found the 15mm Nikkor was too susceptible to flare, even though it has a wider field of view than the 18mm. The 18mm also allows for the addition of screw-in filters on the front of the lens, which is useful for color correction or for using graduated neutral density filters to better balance exposures of bright sky and dark foregrounds. Nikon has since released its 14mm f/2.8 lens, which a slightly wider field of view and significantly less flare than their old 15mm. All of these lenses are good choices if you are shooting basic, single-row cylindrical panoramas, and don’t need your viewers to be able to look too far up or down in your VR movies.
 | While it is possible create complete 360°x180° spherical panoramas with these lenses, doing so requires shooting multiple rows of images (requiring more time and more shots), as well as the use of a multi-row stitching application. The stitching process is more cumbersome and takes longer when you do this, as you’re dealing with more digital files and many more alignment point calculations. The alternative is to choose from the fisheye lenses, which offer greater fields of view and require fewer images for a full spherical panorama. Using a true fisheye, a spherical panorama can be assembled with only three or four images (shot 120° or 90° apart respectively). The tradeoff is that you can’t really pull much detail out of these shots because you’re cramming such large fields of view into each one, and you’re only using a portion of your camera’s sensor to record it. Most of these true fisheyes also have significant flare problems, as well as chromatic aberration near the image edges. With a full-frame fisheye, one gets a nice compromise. Fields of view are still pretty large, but you take advantage of the full area of the sensor with each image captured – thus, gaining significantly more resolution. You can capture almost 140° vertically with a single row of images, and it only takes 6 shots (every 60°) to capture a full 360° around. Add two more shots – one straight up (zenith) and one straight down (nadir), and you have full spherical coverage with just eight images. These lenses also seem less prone to flare and other aberrations, so they produce very nice stitched panoramas. |
| Full Frame Fisheye Assembly |
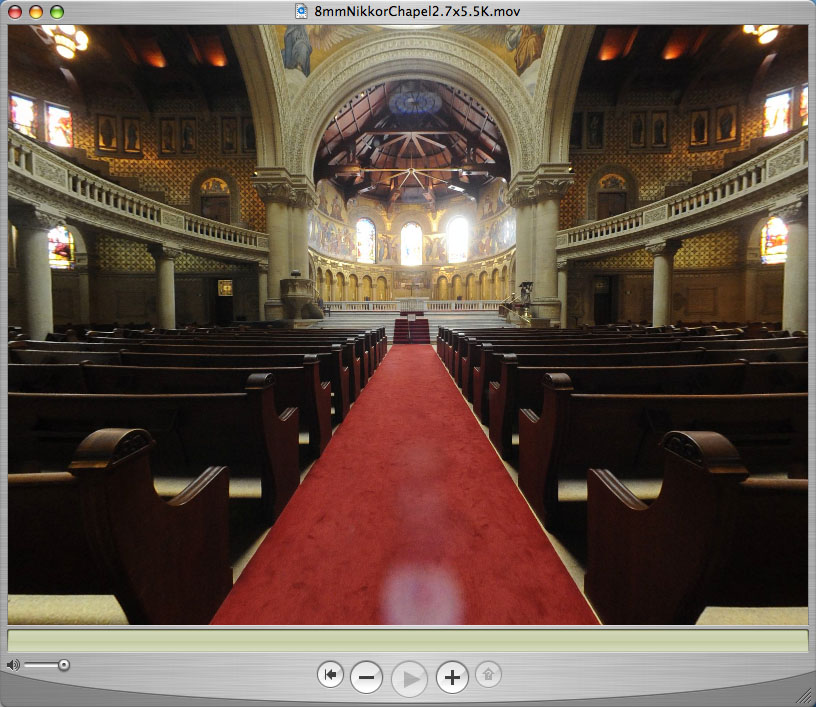
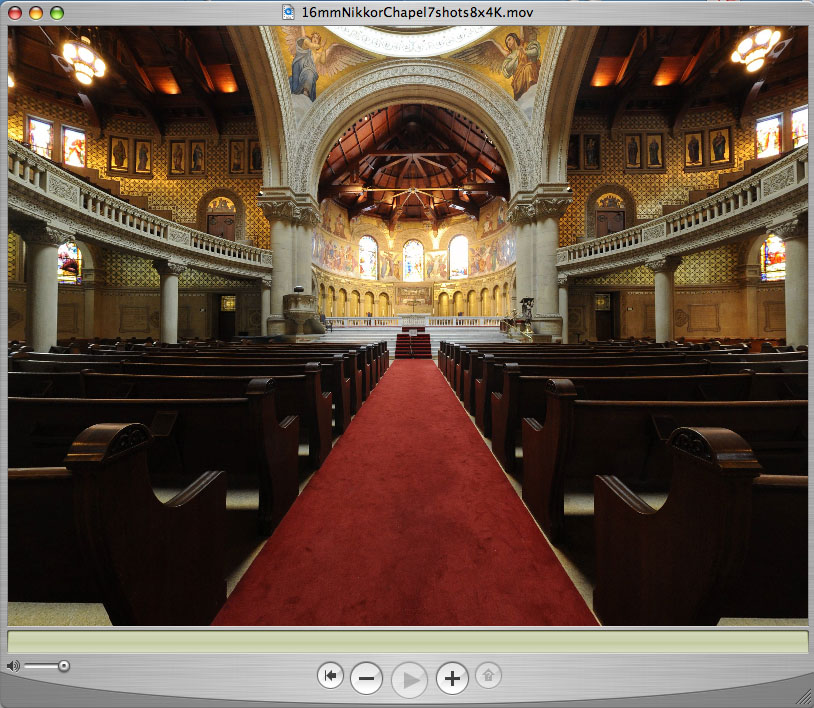
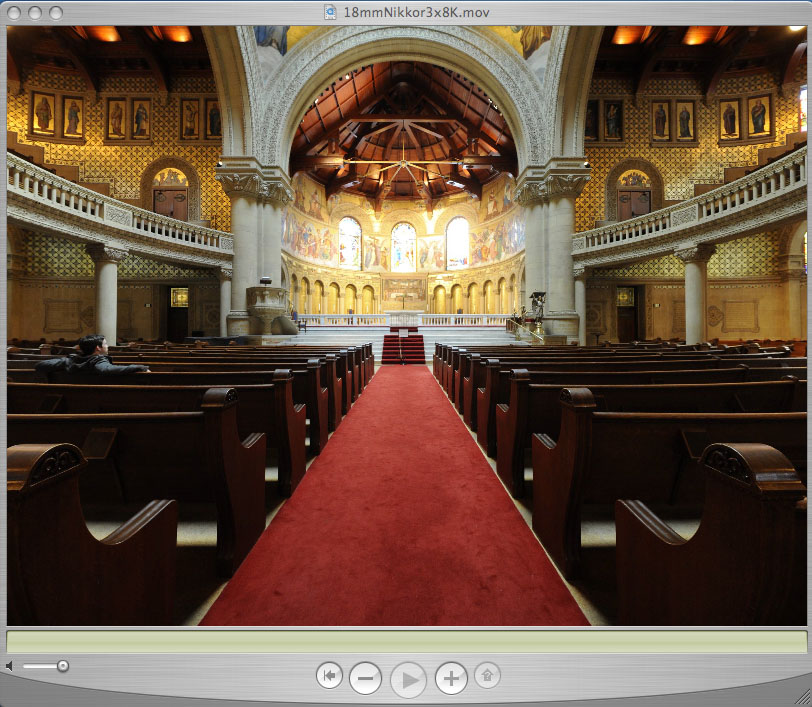
Compare the results of panoramas shot with these different types of lenses below. These panoramas were all shot with the full frame Nikon D3 from the same position inside the Stanford University Chapel in Palo Alto, California. Lenses used were the fisheye Nikkor 8mm f/2.8, the full frame fisheye Nikkor 16mm f/2.8, and the rectilinear Nikkor 18mm f/2.8. They were all shot using a Manfrotto 303SPH pan head, at an aperture of f/11 (using the full-frame format of the camera). JPEG (Fine) files (4,256 x 2,832 pixels) directly from the camera were used and stitched with PTGUI. The stitched movies were not retouched at all in order to show how the flare and other aberrations of each lens affected the result, as well as how extensively the combination of shots covered the panoramic view.