For information on the Nikon D800 and D800e, see:
For Nodal Ninja product information:
|
Case Study: Review of Nikon D800 Camera
|
For information on the Nikon D800 and D800e, see:
For Nodal Ninja product information:
|
Case Study: Review of Nikon D800 Camera
|
Text and photos ©2013 Scott Highton – for Virtual Reality Photography (www.vrphotography.com) – February, 2013
![]()
Background
In this age of continuing advances in digital imaging, it seems as though true “game changing” technologies still arrive years apart. In 2007, Nikon announced a full frame pro digital camera (the D3). It was quickly welcomed (and raved about) by Nikon photographers, who had been waiting years for such a tool.
In the years since, numerous other DSLRs – both professional and prosumer – were offered by Nikon, each with incremental upgrades to existing technologies. These included improved resolution, HD video capability, lower prices, etc. But none were really considered “game changers” like the D3 was in 2007. (Click here to see our 2008 vrphotography.com review of the D3.)
In February, 2012, Nikon once again announced a camera that pretty much stunned the industry – the D800 (and D800e), a DSLR featuring an amazing 36 megapixels of resolution in a full-frame format with dynamic range surpassing almost everything else in the market. It was also priced at half the cost of Nikon’s latest high end professional DSLR, the D4. DxO Labs gave the D800 sensor the highest marks it had ever given to any digital camera, including the D4 and high end medium format systems. (Click here for DxO Labs' D800 review.)
The big advantages of the D800 are its combined offering of:
With its dynamic range and huge resolution increase (about 3x greater than the D3), the Nikon D800 seemed to be an ideal choice for VR panoramic photographers. Its increased resolution means that more detail can be captured with fisheye lenses, yielding higher resolution stitched panoramas from fewer source images.
Nikon Professional Services recently loaned us one of their D800 cameras for extended testing from a VR photographer’s perspective. Thanks to Bill Pekala and his staff at NPS for their assistance.
![]()
Overview
When considering a purchase of the D800 or D800e, your first step should be to download (and read) the User’s Manual. It’s available from Nikon USA’s web site at: http://www.nikonusa.com/pdf/manuals/dslr/D800_EN.pdf
Our review was done with a D800, rather than a D800e. The two versions of the camera are almost identical, except that the D800e removes the slight blurring effects of an optical low pass filter over the sensor (for anti-aliasing) in order to allow maximum image definition. The downside to this is the increased possibility of moiré in certain images with fine detail patterns. However, most D800e users have reported very little in the way of moiré problems under normal use. Most side-by-side comparisons, including those on Nikon’s own web site, show an almost negligible difference in visible sharpness between the two models, even at 100 percent viewing magnification.
In order to fully realize the advantages of the D800, photographers should put the same care into shooting with it that they would with traditional medium format cameras. The D800’s increased resolution will be wasted if attention to shooting technique (i.e. camera stabilization/tripods, use of hyperfocal distances, aperture, mirror lockup/Live View, high quality lenses, etc.) are not used. Nikon has even published a 20-page supplemental D800 Technical Guide, which offers many suggestions and shooting techniques for achieving best results with the camera. Basically, if your shooting technique is at all sloppy, the high resolution images of the D800 will reveal it in minute detail. See: http://www.nikonusa.com/en_US/o/Y6wrkA9OU_z04IreazIXl_22UII/PDF/D800_TechnicalGuide_En.pdf
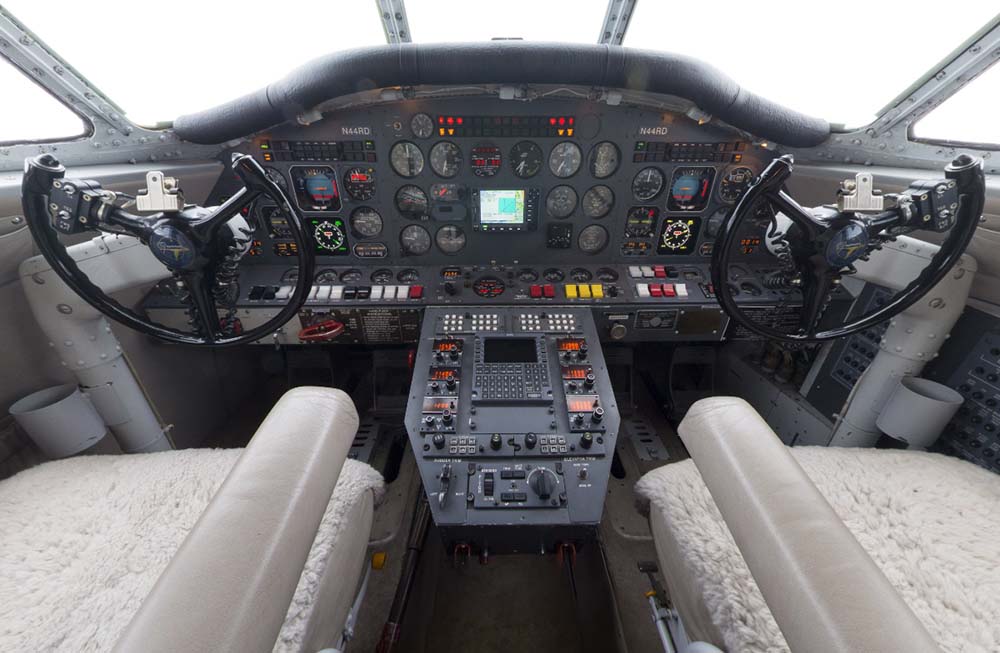 |
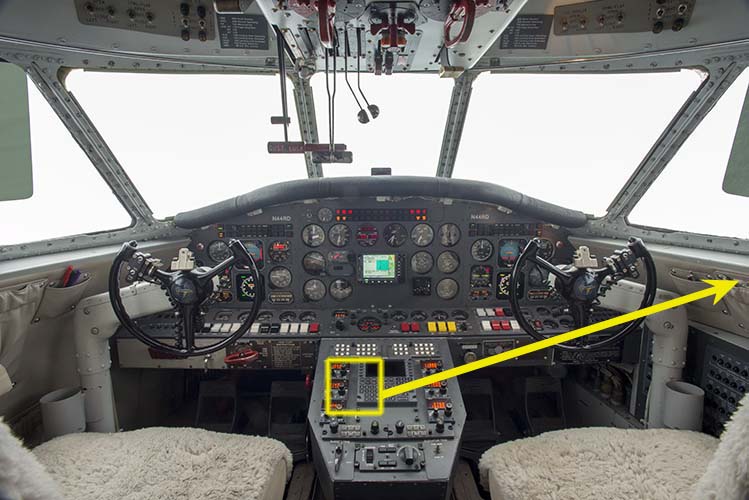
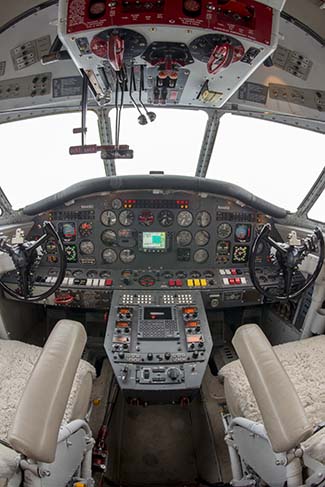
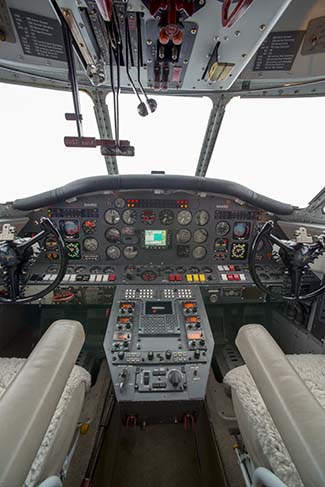
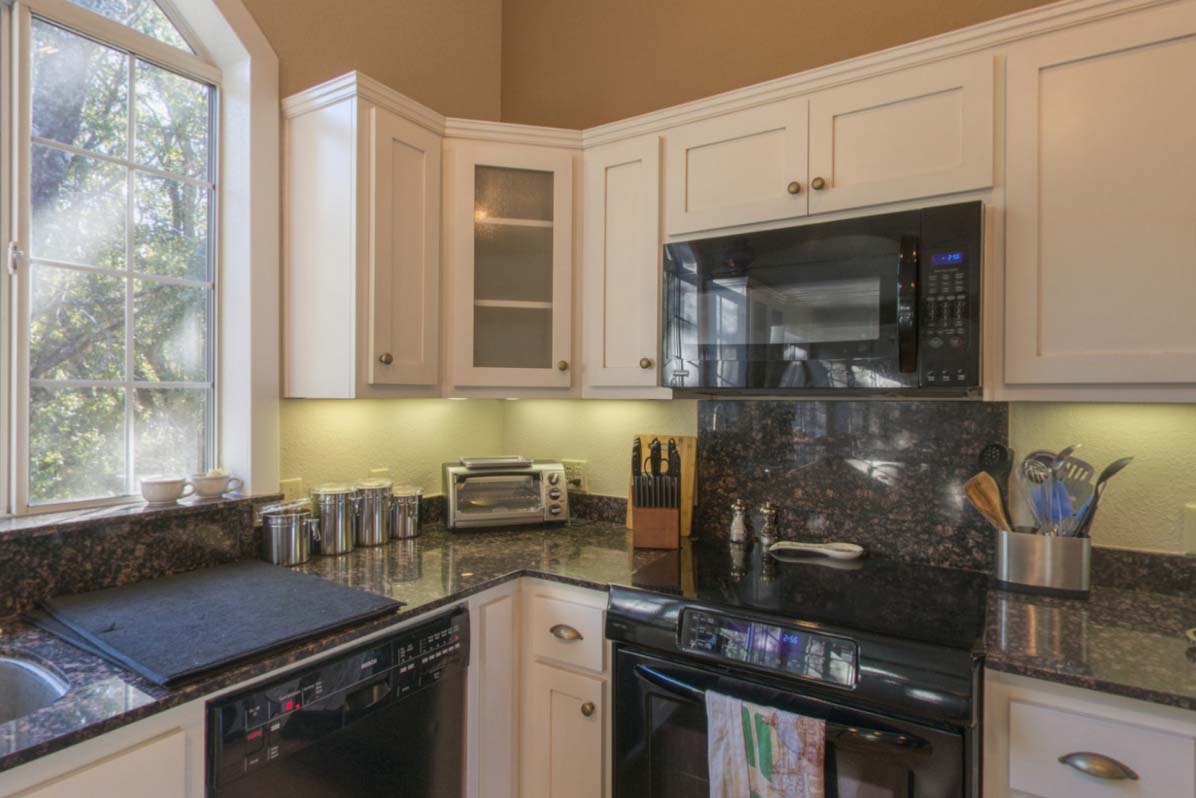
Click here for interactive panorama (10,000 x 5,000 pixels). Grumman Albatross (HU-16) cockpit, Nikon D800 with Nikkor 16mm f/2.8 |
![]()
Costs
Current price for the D800 in the U.S. is just under $3,000 (US), although some online vendors are quoting prices closer to $2,500. (Beware of “stripped down” offers, where the camera is offered for a discounted price but you have to pay extra for battery, charger, or other items normally included with the camera. These are all too common bait-and-switch tactics by disreputable vendors.)
The D800e retails for about $3,300. Nikon manufacturing finally seems to have caught up with the incredible demand for these cameras, as both models now seem to be in stock at most authorized Nikon retailers.
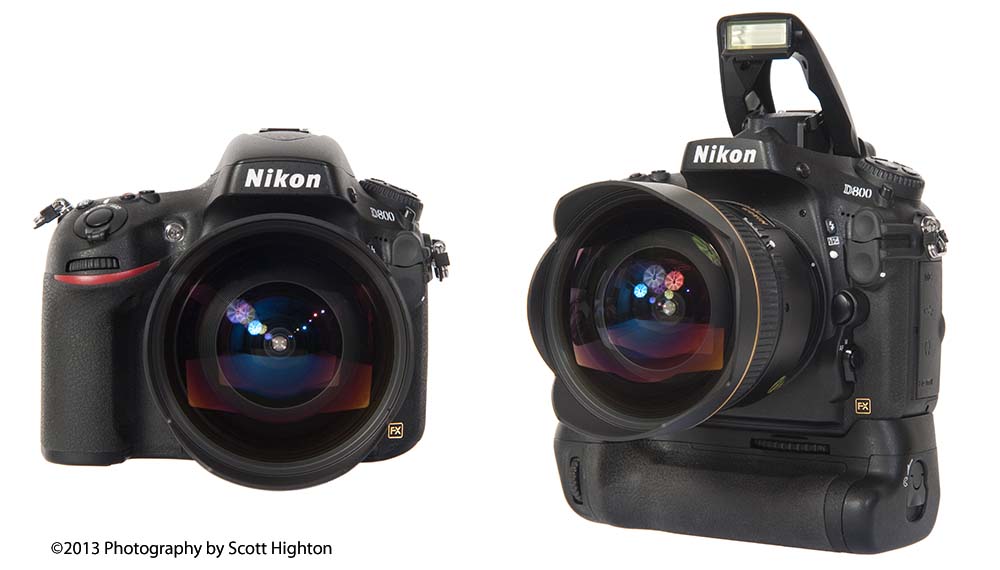
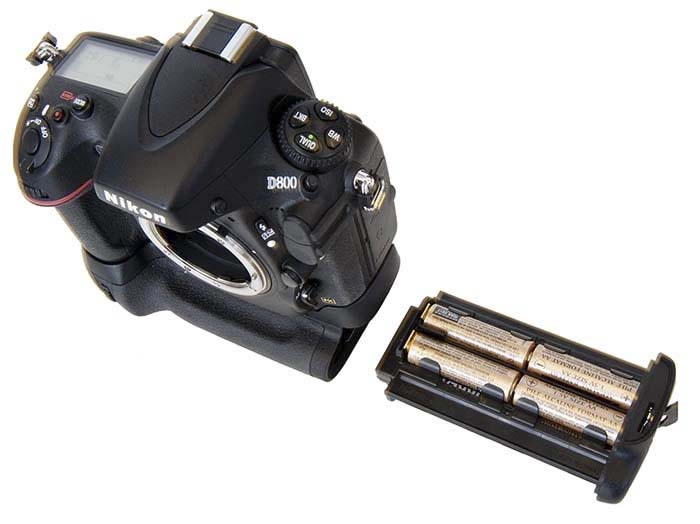
I highly recommend adding the MB-D12 battery grip ($389) to your D800 purchase, as well as at least one additional EN-EL15 lithium ion battery ($60). The MB-D12 gives the D800 a larger handgrip, which is useful when shooting with larger lenses, as well as additional battery power via a second EN-EL15, an EN-EL18, or standard AA batteries. This can be a tremendous asset on location where electrical power might be in short supply for recharging. AA batteries are commonly available worldwide.
 |
 |
MB-D12 battery grip and AA battery holder |
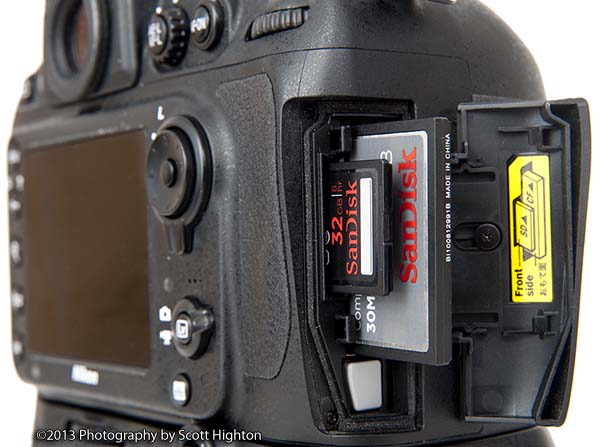
Dual card slots – CF and SD / SDHC / SDXC |
Finally, with all the image data the camera generates, you will need high capacity (and fast) memory cards. The D800 includes dual card slots, one for Type 1 Compact Flash (CF) and the other for SD / SDHC / SDXC cards. The two slots can be configured a variety of ways (the same image written to both cards for backup purposes, different formats of each image to different cards such as NEF and jpeg, overflow – where the first card is filled before the second is used, one card for still images, the other for videos, etc.). Nikon recommends that SD-type cards be at least Class 6 (Class 10 preferred). Otherwise, video recording may stop unexpectedly or frames can be skipped.
CF and SD cards are commonly available in a variety of storage capacities, including 4, 8, 16, 32, and 64GB. A 32GB CF or SD card will store over 700 NEF (RAW) full resolution images (compressed, 12-bit) from the D800, or about 22 minutes of full HD video (1920x1080 at 30fps). They cost between $25 and $50 each, depending on brand and speed. You’ll want at least two of each.
I’ve had good luck over many years purchasing all the above types of equipment through B&H Photo Video in New York. See: http://www.bhphotovideo.com/
There are additional costs that must be factored in to the purchase of a camera like the D800, often including computer, storage, and software upgrades. I’ll discuss these in more detail later in this review. However, as a rule of thumb, consider that you’ll probably spend at least the cost of the camera over again for these.
![]()
Resolution
Thirty six megapixels per image is a significant amount of data. And let’s be honest… this is serious overkill for many types of photography, particularly those for web-based image markets. These are big image files, and VR photographers will shoot a lot of them, since every panorama requires multiple source images to stitch together.
 |
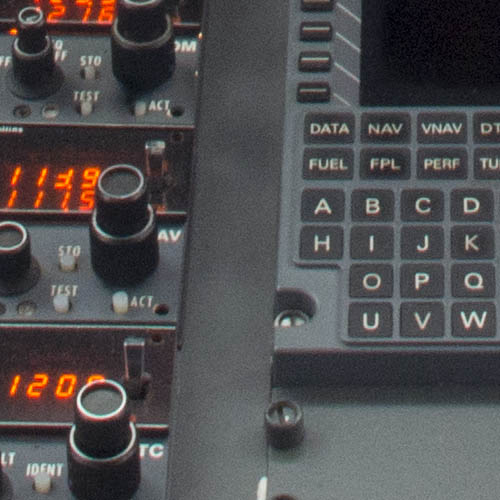 |
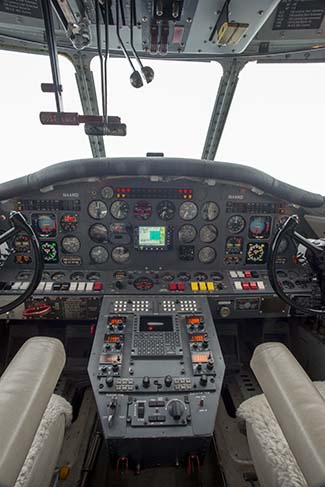
Grumman Albatross (HU-16 ) cockpit, Nikon D800 camera, Nikkor 18mm f/2.8 AF len |
Detail at 100% – 36 megapixel image, ISO 1600 |
A single NEF or raw file generated by the D800 at full resolution can be anywhere from 30-35 MB in size, and when uncompressed / opened in Photoshop, becomes about 103MB. Multiply that by six to 12 shots commonly used to create a 360°x180° panorama, and you’re looking at up to a gigabyte of capture data for every equirectangular or spherical panorama you create.
The great news is that with the D800, photographers can now shoot what have traditionally been considered “high-res” panoramas while using fisheye lenses – enabling larger pan increments between shots with the need for fewer source images.
For example, by shooting with a Nikkor 16mm full frame fisheye lens, you can capture an entire spherical view for effective stitching with six images (pan 60° between each) plus zenith (straight up) and nadir (straight down). If you shot these with a Nikon D3 (a 12 megapixel camera) at full resolution, your stitched panorama winds up about 11,000 x 5,500 pixels (or 170MB). Doing the same thing with a D800 yields a stitched panorama roughly 19,800 x 9,900 pixels (560MB). While this is great for high resolution wall prints and enlargements, it’s impractically large for most interactive VR panoramas published on the web.
However, the increased resolution of the D800 allows photographers to utilize wider (and cheaper) lenses originally designed for prosumer DX cameras while capturing similar resolutions as with a D3 and a 16mm full frame lens.
One such example is the Nikkor 10.5mm DX lens. This lens was designed by Nikon as a DX equivalent for their full frame (FX) 16mm fisheye. The resulting image circle for the DX lens is smaller, but means the lens is smaller in size, weighs less, and costs less.
Unfortunately, in order to take full advantage of the 10.5mm Nikkor lens for panoramic shooting on a full frame (FX) format camera such as the D800, one must cut off the built-in plastic lens hood, which otherwise blocks part of the field of view. This can be done with a sharp utility knife, a couple of hose clamps (mounted on the lens as cutting guides), and a slow, cautious approach. The result is a “shaved” lens providing an unrestricted 180°+ field of view within its image circle on the full frame (FX) image sensor. Be aware that “shaving” the lens hood likely voids any manufacturer’s warranty.
 |
 |
Nikkor 10.5mm (unshaved) on full-frame FX sensor |
Nikkor 10.5mm (after shaving lens hood) on FX sensor |
With this shaved lens, you can now capture full spherical panoramas with only four shots (panning in 90° increments). There is no need to shoot zenith or nadir images, because the lens captures a 180°+ vertical view when the camera is oriented vertically. Four shots give sufficient overlap for stitching, although it is possible to use as few as three (every 120°). I actually prefer using six (every 60°), as this seems to provide smoother and more seamless stitches without significantly increasing data and workflow. Because the camera and lens don’t need to be reconfigured to capture zenith and nadir shots, this setup is preferred by many photographers shooting pole panoramas, where a camera is mounted and remotely fired on the end of a pole, providing unique perspectives from up high or over the edges of balconies and precipices.
When a shaved 10.5mm lens is used with the higher resolution sensor of the D800, a full resolution panorama of about 11,000 x 5,500 pixels can be stitched – effectively the same as using a D3 and a 16mm lens. The advantage to shooting this way is fewer shots, smaller & lighter (and less expensive) equipment, and quicker shooting without the need to reconfigure your pan head for zenith and nadir shots.
As you can see from the above photos, shaving the 10.5mm Nikkor’s lens hood provides a larger field of view and a more complete image circle, but there is still a lot of unused space on the D800’s full frame sensor. These unused black pixels recorded in every frame take up a lot of storage space and memory, slowing down post production and unnecessarily filling memory cards and disk space.
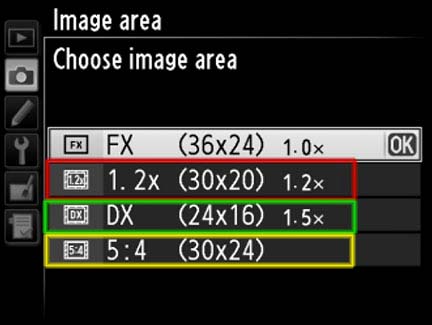
Fortunately, the D800 offers a very nice solution for this in its Image Area menu. You can select either a 5:4 or a 1.2x crop (in addition to the DX / 1.5x crop) when capturing each image. These options allow you to record with a smaller area of the D800’s sensor, which more closely matches the image circle of the 10.5mm shaved lens. It doesn’t change the resolution (or pixels per inch) the camera is capturing, it just means you don’t record millions of unnecessary black pixels outside of the lens’ image circle for every shot. This can greatly help with post production processing and storage requirements.
If you want to keep the full width of each shot (when shooting in portrait mode), choose the 5:4 crop. If you want to crop a bit more narrowly, choose the 1.2x crop. Both will maintain the full 180°+ vertical coverage of the lens.
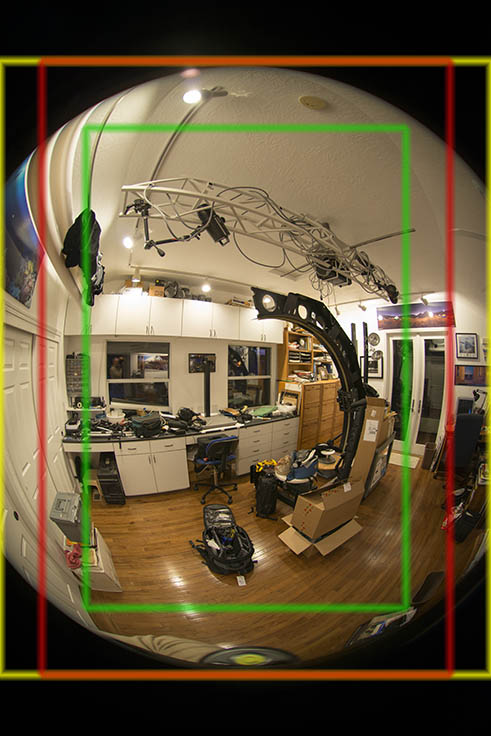 |
Nikon D800 Image Area options
|
Other lenses that VR photographers commonly use for panoramas include the Nikkor 14mm f/2.8 AF and 18mm f/2.8 AF rectilinear lenses. The longer the focal length, the smaller the field of view that is captured with each shot, and therefore, the greater number of shots are needed to provide a full 360°x180° equirectangular panorama.
 |
 |
 |
Nikkor 16mm (full-frame fisheye) |
Nikkor 14mm (rectilinear) |
Nikkor 18mm (rectilinear) |
Again, with the huge file sizes and resolution of the D800, photographers should be cautious about shooting panoramas with focal lengths that are too long for practical stitching. As you get into the 50mm and longer range with the D800, you’re entering gigapixel (one billion or more pixels) panorama territory – at least for 360°x180° equirectangular panoramas, and will find that your stitched panoramas are larger than Photoshop can currently handle. We were unable to test the D800 with a GigaPan head and stitching software, but more information can be found at the GigaPan web site: http://gigapan.com/
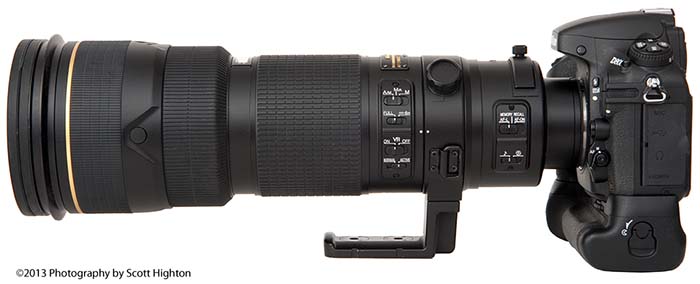 |
Nikon D800 and MBD-12 grip with Nikkor AF-S 200-400mm f/4G ED VR II lens |
![]()
Dynamic Range
One of the challenges panoramic photographers face is trying to properly expose an entire 360° image sequence with the same exposure setting (which is necessary for best stitching results). Full panorama views often include a wide range of lighting intensities, from the bright window side of a room or sunlit exterior to deep shadows of recessed or shaded areas. It is not unusual to encounter 10–15 stop lighting differences under harsh indoor or outdoor situations. (One stop represents either double or half the amount of light. A 10 stop lighting range equals a difference of two to the tenth power, or 1,024 as much light.)
These relative brightness intensities often far exceed the exposure latitude or dynamic range of most digital cameras (and films). One of the skills that professional photographers bring to the table is their ability control available light and use supplemental lighting techniques to bring these light intensities into a range that cameras and films can capture. With traditional slide or transparency films, this range was as small as four or five stops. Most modern digital cameras generally offer 6-12 stops of dynamic range.
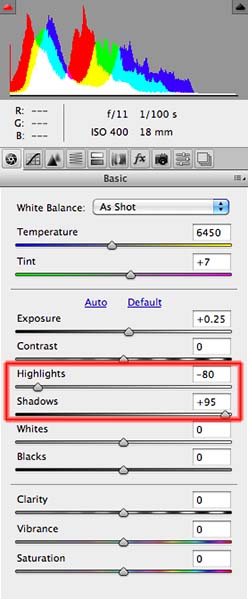
The D800 offers an amazing 14 stops of dynamic range, making it possible to capture highlight and shadow details in all but the most extreme lighting conditions. This is a tremendous help to panoramic photographers. It means you can make a good exposure for a room interior, but also draw details out of sunlit areas or exterior views through windows. Note that this does require working with NEF (RAW) image files and appropriate post processing work in Photoshop or Nikon’s Capture NX2, but the data is available for this with D800 NEF images. Slightly more range is available with 14-bit RAW images than 12-bit, a shooting option available through the D800’s Shooting menu: NEF (RAW) Recording.
 |
 |
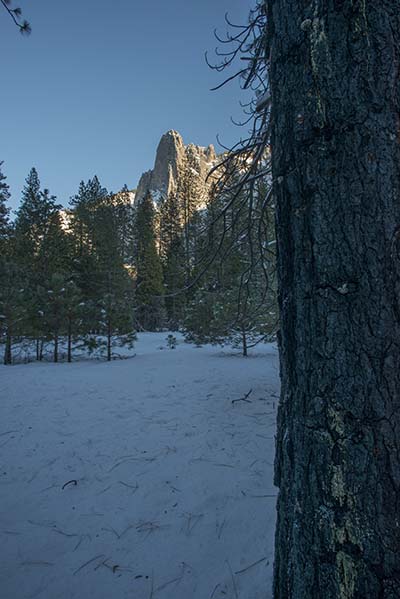 |
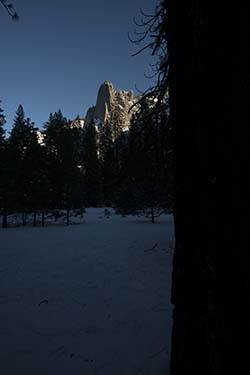
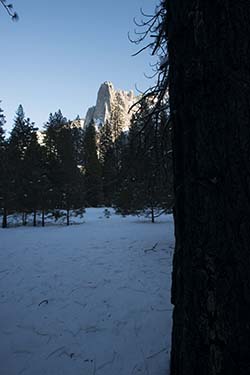
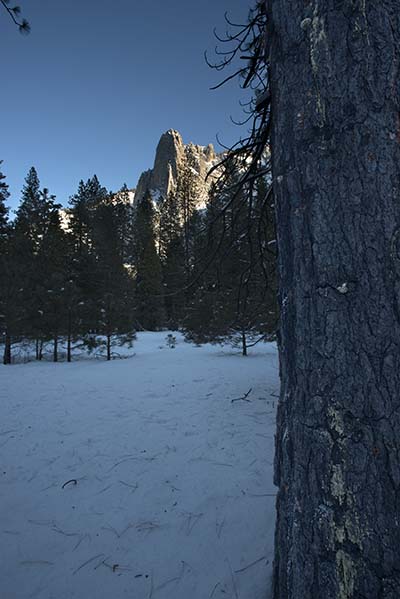
D800 original (as shot) from NEF or RAW file |
Adjust NEF in Adobe Camera Raw (ACR) |
Result – Camera Raw adjustments only |
-3 stops
Bracketed images (2 stops between each) shot on tripod for HDR combination
|
 |
|
Result with HDR combination technique |
||
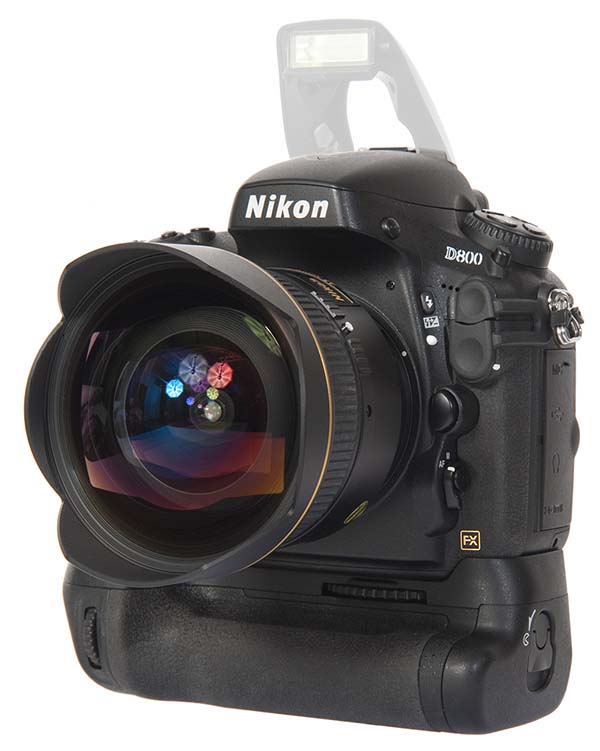
One of the other features I love about the D800 is its pop-up flash on top of the viewfinder. Nikon doesn’t usually include this feature on its high end pro cameras, such as the D3 series or D4, but it can be a handy tool when you want to add a small amount of fill light to balance exposure in an image. Mind you, it’s nowhere near as powerful as an SB-900 or SB-910 strobe, but it can provide enough light to fill in shadows, or add a foreground kick / eye light when needed, without having to carry the weight of an external strobe.
Simply push the release button on the side of the viewfinder, and the small pop-up flash is ready to go. Its intensity can be balanced either in manual or TTL via the camera’s Custom Setting Menu: Bracketing/Flash. It doesn’t work well with larger lenses because the lens itself will cast a shadow from the pop-up strobe’s light, but it’s quite handy to use in relatively close range with short, wide lenses common to VR panorama photography.
![]()
High ISO and Low Noise
One criticism photographers had about the D800 after it was announced was that its range of ISOs was no different than that of the five-year old D3 series cameras (ISO 50 through 25,600). They expected more, especially since Nikon’s new D4 was boasting a low light range up to ISO 204,800 (3 additional stops).
While the criticism was quickly answered with the significant cost difference between the two cameras, what critics hadn’t considered was the fact that the incredibly high pixel density or resolution of the D800 means that the noise it produces at high ISOs will generally be less noticeable in the overall image. They also overlooked the fact that the D800 is primarily intended for photographers shooting in a more controlled manner than, for example, photojournalists covering fast action sports at night. If you really need 11 frames per second at high shutter speeds under low light conditions, then perhaps a camera like the D4 is a better choice for you. But if you’re looking for maximum resolution where you can shoot carefully under better-than-minimal lighting conditions, the D800 is probably a far better choice. Personally, I’ll be keeping my D3 and using it in combination with a D800, depending on the assignment or task at hand.
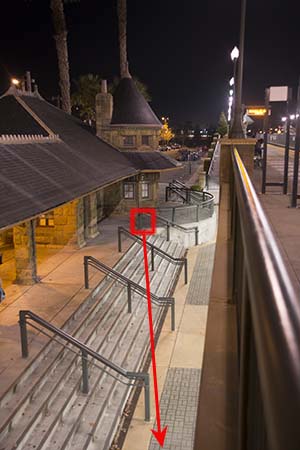
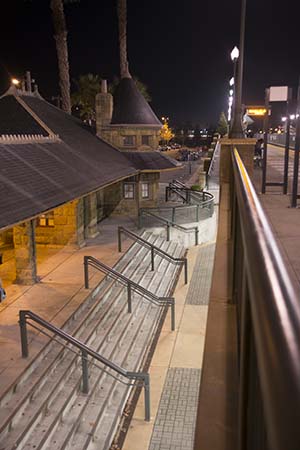
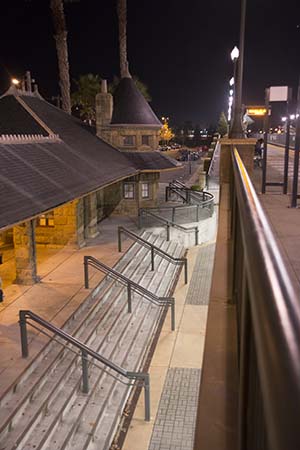
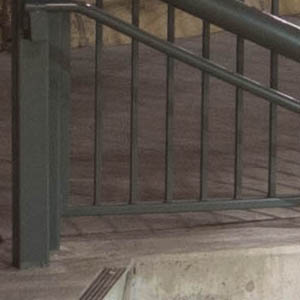
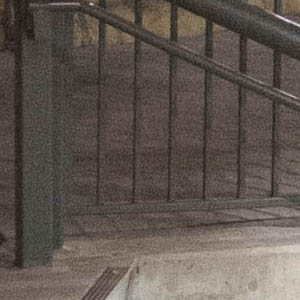
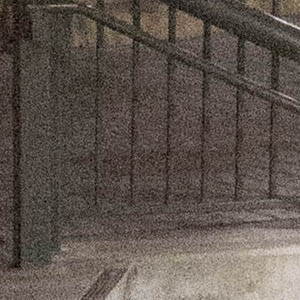
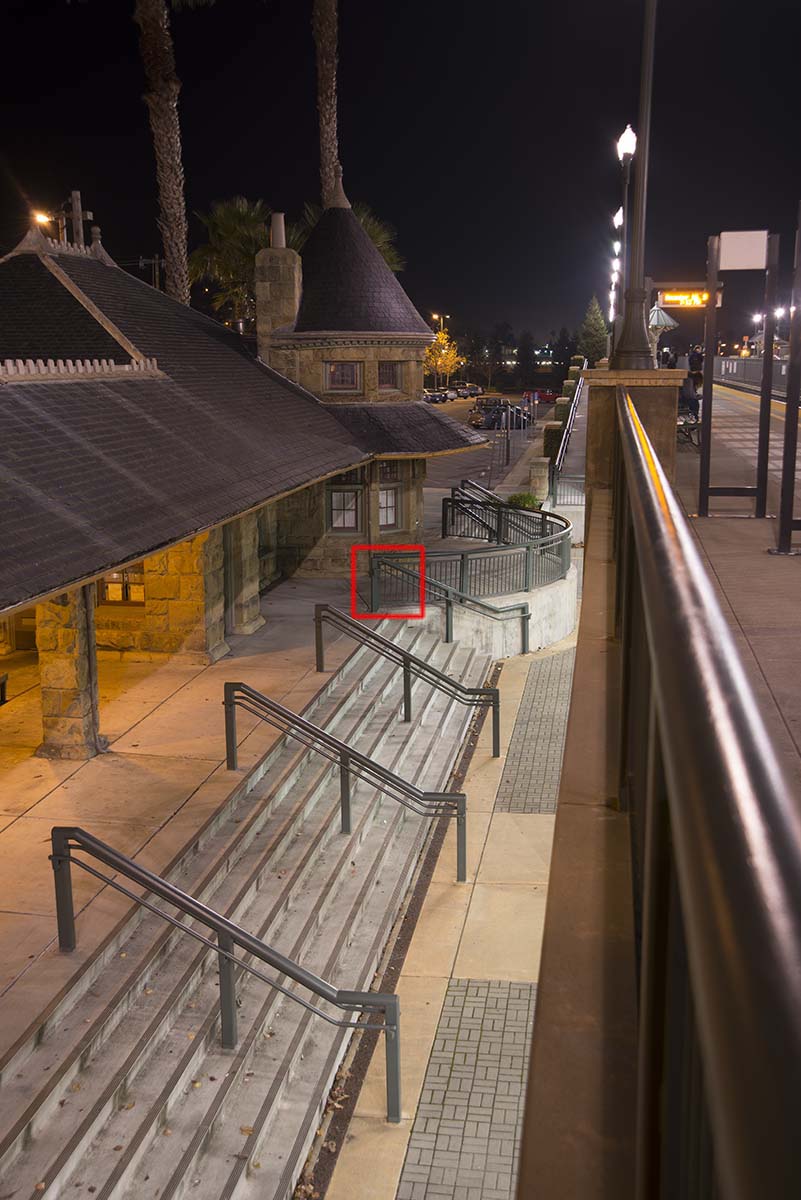
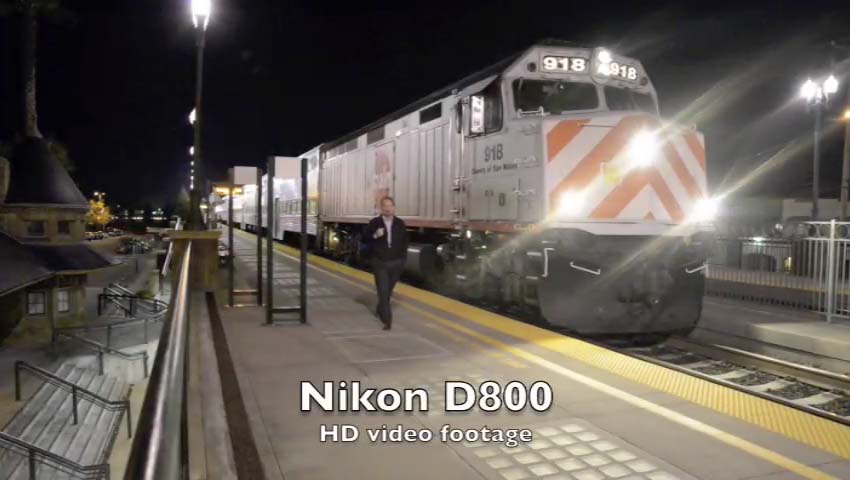
To test the D800’s low light performance, we put it through its paces at an outdoor train station at night using only available lighting.
I found the results very acceptable up to about ISO 3200. At 6400 and beyond, the noise becomes noticeable, but is still acceptable for most work, particularly if you’re not enlarging the final images to wall-sized art. I feel that fast shutter speed / low light photography is a tradeoff between achieving sharpness and high-ISO noise. If a slower shutter speed means I can’t get sharp results, I’d rather live with a degree of visible noise than a blurry and useless image.
 |
 |
 |
 |
Nikon D800 – ISO 100 |
ISO 400 |
ISO 3200 – High ISO NR turned off |
ISO 12800 – High ISO NR turned off |
 |
 |
 |
 |
ISO 100 detail (100%) |
ISO 400 detail (100%) |
ISO 3200 detail (100%) |
ISO 12800 detail (100%) |
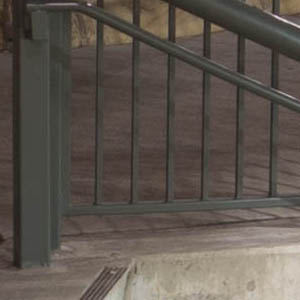
Of course, not all low-light photography needs to be done at high shutter speeds or high ISOs. Panoramic photographers in particular often shoot low light or night scenes on a tripod with both long exposures and low ISOs. One of the traditional drawbacks to digital cameras is the increase in digital noise that results from long exposures. The D800 seems to have improved on this significantly, even without its noise reduction algorithms switched on.
The D800 offers two different categories of noise reduction (NR) within its Shooting menu – High ISO and Long Exposure. High ISO NR can be set to different levels, and will reduce the amount of noise in a high-ISO image via in-camera post processing. Long Exposure NR is either on or off, and reduces noise from long exposures (longer than one second) by capturing a second “dark slide” image of the same exposure duration and subtracting that noise from the image captured through the lens. It’s quite effective most of the time, but sometimes seems to confuse small pinpoint light sources such as stars or fireworks with noise and removes them when processing the final recorded image. The other drawback to using Long Exposure NR is that it ties up the camera while it’s performing the NR “job”. Therefore, if you’ve made a sixty second exposure, you can’t shoot again for at least another minute while the camera captures the second dark slide exposure and processes everything.
For our night train station tests with the D800, I turned off both High ISO and Long Exposure noise reduction. I was pleasantly surprised to see that there was very little difference in the quality of long exposure images (shot at less than 30 seconds) without the Long Exposure noise reduction turned on. I do recommend using High ISO noise reduction for high ISO situations if you can. You will want to do your own tests to determine what setting (high, normal, low, or off) works best for your particular tastes.
 |
 |
3 seconds – Long Exp. NR turned off |
|
 |
|
13 seconds – Long Exp. NR turned off |
|
 |
|
25 seconds – Long Exp. NR turned off |
![]()
Video
Over the last few years, camera manufacturers have expanded the feature sets of their DSLRs to include video capture and recording capabilities. This has been very welcome by photographers, who embrace adding another creative tool to their arsenal by not only upgrading to the latest DSLR, but also gaining a high definition (HD) video camera in the process.
Nikon has offered this capability in a number of their recent DSLRs, including the D800. With each new product release, it seems the cameras’ video capabilities increase.
However, photographers should be aware that just because a camera can shoot video, it may not necessarily be the right tool for the video work you want to do.
Traditional video and motion picture cameras have evolved over many decades, and their evolution has been guided by the unique requirements of motion image photography. The overall design and ergonomics of a motion / video camera are necessarily different from those of traditional still cameras, primarily due to how each are used. Video / motion cameras are usually shoulder or tripod mounted, properly balanced to remain as stable as possible, with a side viewfinder or eyepiece positioned immediately in front of the cinematographer’s eye. The camera basically sits to the side of the camera operator’s head. Still cameras are smaller and more easily moved for quick positioning (i.e. less stable), easily rotated between vertical and horizontal orientation, and intended to be held in front of the photographer’s eye (cradled in the photographer’s hands or on a tripod). There are significant differences beyond basic ergonomics, as well.
Because these two types of photography are so different, it is difficult for camera manufacturers to design a single camera that does both well, even though modern digital sensors are capable of high quality imaging for both purposes.
The D800 offers a number of attractive video capabilities. But the primary one is an ability to digitally capture high definition (HD) video utilizing a full frame (35mm) sensor and Nikon’s vast array of incredible lenses. These range from fisheye to super-telephoto, along with specialty optics such as macro and tilt/shift lenses. Unfortunately for video shooters, Nikon’s quality lenses, including their zooms, have been designed primarily for still photography. They lack the motorized zoom (i.e. variable zoom speeds via a rocker switch) or even the silky smooth manual zoom of quality motion picture and video lenses. The full frame format of the D800’s video capture, however, provides the desirable selective focus and narrow depths of field traditionally available only from high-end motion picture or video systems. Basically, if you can capture a specific perspective and look for your still photos using a combination of Nikon cameras and lenses, you can now do the same for motion or video work – using the same camera.
Unfortunately, DSLRs – including Nikons – are again designed primarily as still cameras. While they often perform these functions exquisitely, they all too often fall short of basic video functions found in even low-cost consumer video cameras, like continuous autofocus, image stabilization, auto-exposure, smooth zooming, etc. For this reason, I find the D800 – and most other DSLRs on the market today – to be limited in their usefulness for production HD video work. I think they’re great for B-roll shooting – action sequences, point of view (pov) perspectives, beauty shots, etc., as well as other unique jobs, such as time-lapse capture.
Certainly it is possible to use the D800 as a full-fledged production video camera (and a number of companies have touted their use of the D800 on broadcast television programs such as Dexter and Wilfred), but the investment in all the additional support equipment necessary is significant enough that you may bebetter off investing in a dedicated video camera from the outset. For an insight into how much additional equipment is needed, take a look at Sareesh Sudhakaran’s wolfcrow blog pages (specifically written for rigging a D800 or D800e for HD video production): http://wolfcrow.com/blog/master-guide-to-rigging-a-nikon-d800-or-d800e-part-12/
![]()
All these shortcomings aside, the D800 still offers some very attractive video capabilities.
The D800’s sensor does produce beautiful video with wide exposure latitude, full HD resolution (in a variety of full and cropped frames), external audio input, HDMI output for uncompressed HD video recording… plus the big one – the ability to easily shoot with just about any Nikon F-mount lens ever made.
In my video tests of the D800, I was pleasantly surprised to see that Nikon has done a great job mitigating the rolling shutter effects that plague most cameras with CMOS sensors. These tend to produce a “jello” effect with fast moving subjects or rapid camera movements.
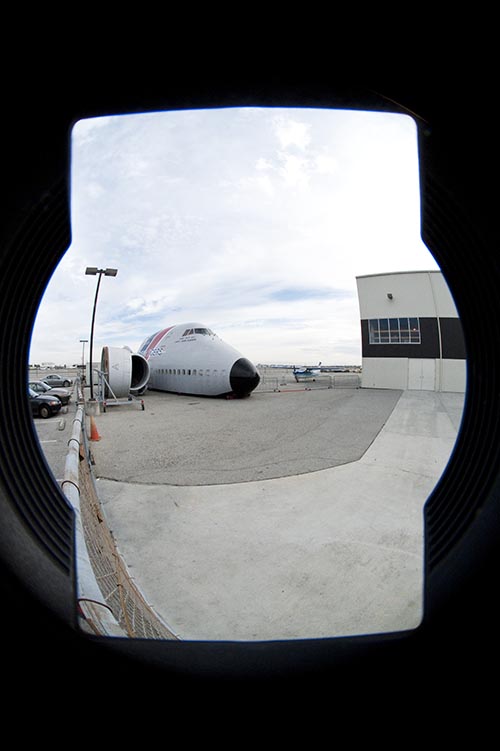
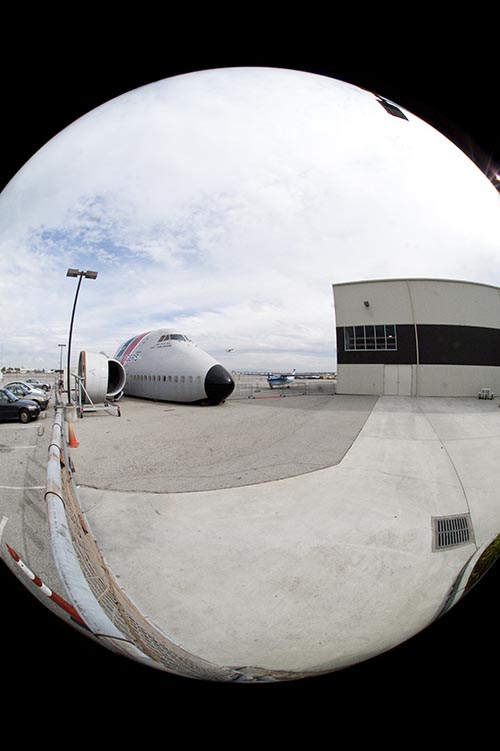
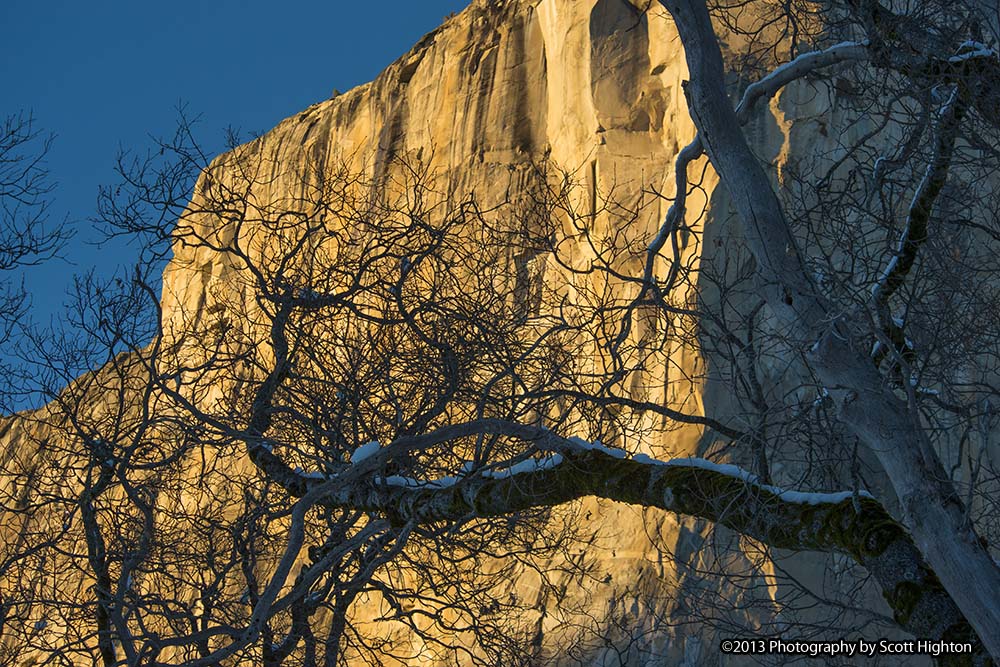
To test this, I went out to the airport and shot aircraft taxiing and landing. Most CMOS sensor cameras make a mess of rotating propellers, but with the D800, they wind up looking quite natural. This, combined with an ability to adjust the shutter speed for the video, gives the D800 video photographer a great deal of control over motion blur smoothness or even stylized freeze-frame effects.
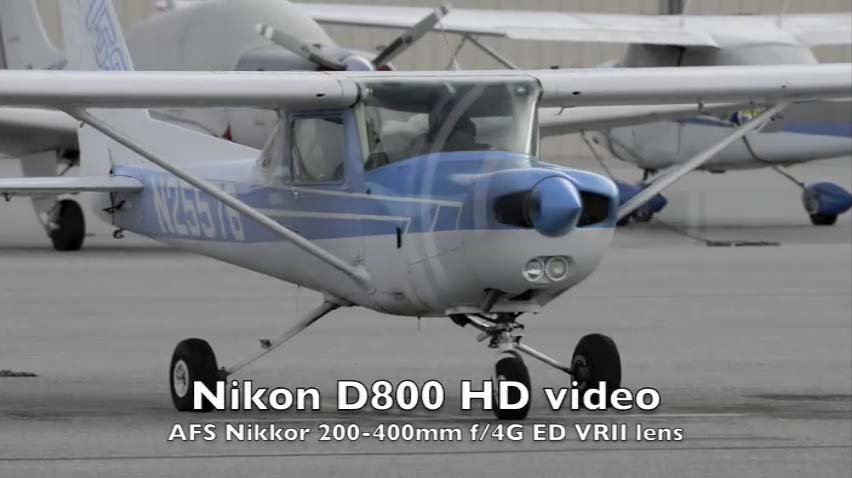 |
Click here for downsampled movie (original D800 HD footage recorded at 1080p) |
One thing the D800 does not do well in video mode is continuous autofocus. This is one of those capabilities that even the cheapest consumer video cameras do well. I used the latest AF-S Nikkor 200-400mm f/4G ED VRII lens ($7,000 SRP) on the D800 for this test. This lens is quite sharp and provides both predictive and continuous autofocus when used for still photos on Nikon cameras, even at high frame rates of 9-11 fps (available on the D3 and D4). But when you use it in video mode on the D800, it doesn’t keep up at all. Focus distance remains almost static – where it was last set using the AF button or by lightly pressing the shutter release button. To get it to refocus, you have to go through this process again. Often, the autofocus system seems to get lost in video mode, and racks focus all the way in and back out as it struggles to find the right distance. All of this gets recorded as part of your video clip, along with sounds of the motor focusing through the in-camera microphone.
This overshadows many of the advantages of shooting video with a full frame sensor. The best solution for this focus problem is to install a manual focus-pulling system on the lens and block out all your subject’s action ahead of time. When doing this, you need to preset your focus distances and have an assistant or focus puller manually adjust focus with the subject’s movement. Obviously, this is only practical for controlled subjects and shooting situations, and is impractical for a one-person crew shooting more unpredictable subjects like sports, video journalism, or wildlife.
When I queried Nikon about this problem, they responded that, “Autofocus in video mode is limited at best. The technology is not like consumer video cameras and can only track very slow moving objects at this time. This is a big area that all (DSLR) manufacturers are working on.”
![]()
Low light video shooting was a strength of the D800 in my tests, along with its ability to shoot time-lapse sequences. There is some incredibly creative work being done by time-lapse videographers today, and the D800 is a popular and capable tool for shooting this sort of work.
With the D800, you can select whatever frame rate (the time interval between each frame) you want for your time-lapse sequence, from one frame per second to multiple hours between shots. There is a limit of 7 hours 59 minutes for the total shooting time that can be captured, so it’s impractical to shoot time-lapse sequences that span a longer period than this. Most time-lapse video work of human activity and nature is shot using intervals ranging from one frame per second (traffic flows) to about one frame per minute (clouds & stars).
Remember that time-lapse video will usually be played back at 30 frames per second (fps), so if you shoot at a one fps interval, you will get two seconds of video from every minute of shooting time (60 frames at 30 fps playback rate = 2 seconds). If you shoot at a one frame per minute interval, it will take you an hour of shooting to get that same two seconds (60 frames) of recorded video.
Time-lapse video photography requires a tremendous amount of patience and planning. Capturing the earth’s rotation under the stars at night might require eight hours of shooting at one frame per minute, in order to yield only 16 seconds of time-lapse footage (8 hrs x 60 frames per hour / 30fps playback speed).
The use of a tripod, manual exposure, manual focus, and manual white balance is essential for most time lapse work.
 |
Click here for downsampled movie, including time-lapse (original D800 HD footage recorded at 1080p) |
The D800 will record time-lapse sequences directly to movie (.mov) format. This saves tremendous post production time and file space as compared to having to shoot full resolution stills, down sampling each to HD resolution, and assembling them in a video timeline after the fact. It also lets you see your time-lapse results on the camera’s viewing screen right away.
I loved using the D800 for time-lapse shooting, but I had a concern about the camera’s time-lapse operation. When shooting such sequences, the D800 takes individual still photos, raising the mirror and activating the shutter for each frame. Nikon’s literature indicates that the D800’s shutter durability is tested to 200,000 cycles, which seems reasonable for most still photographers. But when the shutter is activated for every frame of time-lapse video capture, these numbers can quickly add up.
Consider that a 30-second time-lapse movie, shot at one frame per second for 15 minutes, involves almost 1,000 shutter activations. Shooting only 200 such sequences would put the camera very close to its 200,000 cycle test mark.
It might make more sense to have the camera operate in video mode for time-lapse work, where the mirror is locked up, the shutter open, and frames captured by the sensor at whatever interval is chosen. This would eliminate activating the shutter mechanism for each frame. The down side to this would be the heat and associated noise generated by the sensor when it is continuously operating, which is one reason why continuous video recording on the D800 is limited to about 30 minutes. If the sensor gets too hot under the demands of video capture, the camera automatically shuts down until the sensor has cooled.
A Nikon rep responded to this, saying there is little cause for concern. “This (200,000 cycles) is simply a testing benchmark, and represents the least amount of cycles that the shutter should endure,” he said. “As you know – most work far longer. I have seen some that reach even a million cycles.”
The D800 will also shoot Interval Timer photography. This is similar to time-lapse recording, but the Interval Timer function directs the camera to capture full resolution still images, saving them as individual image files, rather than assembling them into an HD movie sequence in camera. The Interval Time settings are similar to the Time-Lapse controls. You choose the interval between shots and then set the total number of shots you want captured. The D800 can also shoot bracketed interval sequences (bracketing exposure, flash, or white balance) this way, shooting a user-specified number of exposures at each interval.
In addition to the essential improvement of the autofocus capabilities of the D800 (and other DSLRs) when in video mode, one other feature that would really make this DSLR valuable for shooting video would be slow motion capability. Once again, this is a feature that many low end consumer video cameras offer in varying degrees, so the technology for doing it is readily available.
A D800 with 3x–5x slo-mo (90-150 frames per second) HD recording capability would become an invaluable B-roll video camera. Most sports and wildlife action can be beautifully captured in this range, and further speed adjustments (faster or slower) can be smoothly rendered with readily available post production software. I know a number of video photographers who would purchase a Nikon DSLR at the drop of a hat for this feature alone, if it were offered. Combined with the high resolution capabilities, dynamic range, and price of the D800, such a camera would probably be in even greater demand than it currently is by a broad spectrum of both still and video photographers.
![]()
Summary
I have found very few downsides (beyond video limitations) to this camera after my month of testing. It’s not really a camera intended for fast action or sports. Its top shooting speed is four frames per second. If you need a faster capture rate than that, consider the Nikon D4 or D3 series cameras, but be prepared to spend about twice as much as you would for the D800 ($6,000 vs. $3,000 US).
The D800 is a dream for commercial work, advertising, fashion, landscape, nature, portraits, weddings, etc. where high quality and high resolution are important, but where the ability to capture very high speed sequences is less so.
Keep in mind the greater costs for storage and post production with the D800’s high resolution files. If your working mantra is “digital is cheap” and you shoot hundreds of subtle variations of the same subject, you might want to rethink using a D800 or D800e. With files this size, it’s really not so cheap.
![]()
One of the pet peeves I’ve had with Nikon cameras for a while now is their placement and use of the 10-pin connector. This connector is how remote shutter releases and GPS units attach to (and communicate with) Nikon cameras. The D800 uses this, as well.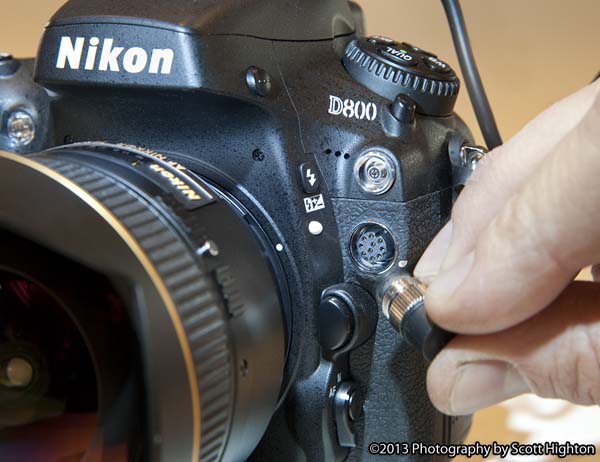
The problem is two fold. First, the placement of the 10-pin receptacle on the D800 (as well as most other recent Nikons) is in a tight corner on the front of the camera just below the viewfinder prism. Unless you have child-size fingers, it’s almost impossible to screw (or unscrew) the threaded rings that hold these connectors in place. If cold weather requires that you wear gloves while shooting, you won’t have a prayer of threading or unthreading this ring. Repositioning the 10-pin receptacle on most Nikon cameras so that it’s more easily manipulated by large fingers (or those in gloves) would save a lot of photographers anguish from disconnected plugs. This is an issue for panoramic VR photographers who often need to use remote shutter releases for pole panoramas, and often under inclement conditions.
Secondly, there is only a single 10-pin receptacle on the camera, so if you need to connect a remote shutter release and a GPS unit, you’re stuck choosing one over the other. Wireless remotes have to plug into the single 10-pin connector jack on the camera. Many photographers also want to embed GPS location information into their IPTC metadata, and this requires an external GPS unit (such as Nikon’s GP-1) to be plugged into the same 10-pin receptacle.
I feel that a professional DSLR should include a built-in GPS unit, much like many low-cost consumer video cameras do. It should also include menu options giving the user the ability to turn GPS recording on or off. This addition alone would eliminate the biggest problem of having only one 10-pin connection available.
Alternately, a second 10-pin receptacle could be included elsewhere on the camera body (or as part of the MB-D12 battery holder). But this is less desirable, as it would likely require a larger, heavier camera body – which would be counterproductive when one needs to mount a camera on a pole to extend over a balcony or ledge.
![]()
Finally, if you’re considering the purchase of a D800, you do need to consider the additional costs of ownership beyond the camera price. You will most likely need to upgrade your image processing software (Photoshop, Lightroom, ACR, etc.). This may also require a computer upgrade, as the latest versions of Adobe software need certain minimum processor speeds and system software. Stitching and VR production software may also require upgrades. With the significantly larger file sizes produced by the D800 (103MB per image at full, uncompressed resolution), you’ll probably need upgrades to your computer’s memory and storage devices, as well as larger CF and SD / SDHC / SDXC storage cards for the camera itself.
All of these additions can easily raise the $3,000 cost of a D800 camera to twice that, or more. Of course, you will probably benefit in other ways by having a newer, faster computer and other peripherals.
For more information on the Nikon D800, D800e, and various accessories, see:
http://imaging.nikon.com/lineup/dslr/d800/
 |
Software for use with Nikon D800 NEF (RAW) Files
For a technical perspective on the requirements for using Nikon's D800 RAW files with Adobe Photoshop and Photoshop Lightroom, Adobe offered the following information. The latest version of Adobe Camera Raw (ACR) is version 7.3 (as of this review date – February, 2013). ACR allows Adobe software to directly open and read proprietary RAW file formats, such as those from the Nikon D800. ACR is updated quarterly to support the latest popular cameras. ACR 7 includes an improved imaging algorithm, and is compatible with Photoshop CS6 and Lightroom 4, but is not compatible with Photoshop CS5 or Lightroom 3. Nikon D800 and D800e RAW (NEF) files can work with Photoshop CS5 (utilizing ACR 6.7) or CS6. D800 and D800e RAW files are only compatible with Lightroom 4. Although D800 and D800e RAW (NEF) files cannot be read by either Photoshop CS4 (or earlier) and Lightroom 3 (or earlier), customers can use a tool to convert their NEF files to the open DNG file format. The free Adobe DNG Convertor is available here: DNG files can be read by all versions of Lightroom. System requirements (both Mac and Windows) for the above software are available on the Adobe web site at:
Nikon’s own Capture NX2 software works with older Mac and Windows systems, and is also updated regularly to handle RAW or NEF files from Nikon’s newer camera models. For Capture NX2 information, see: |
 |
|
 |
![]()
![]()
![]()
Essential VR Photography Tools – Fanotec and Nodal Ninja
For the panoramic photographer, choosing a camera and lens is only part of the process. Another critical tool in the process of shooting stitched panoramas is a VR pan head.
For our tests of the Nikon D800, we were very fortunate to have been provided a selection of heads from Nodal Ninja (see: http://www.nodalninja.com ). Thanks to Bill Bailey and his staff, along with Nick Fan of Fanotec, the developer and manufacturer of Nodal Ninja equipment.
The Fanotec product line includes a number of well thought-out pan heads, each designed from the perspectives of working photographers. Most are intended for professional use in the field, with minimal weight, heavy duty construction, and affordable prices. The company, which has been in business since 2004, and regularly updates their products based on feedback from the many photographers using them.
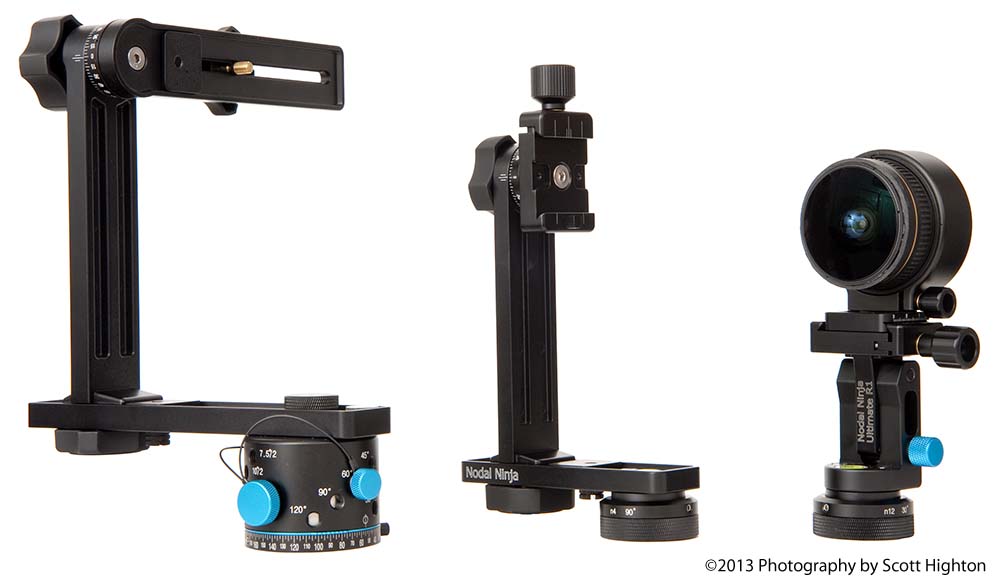 |
Nodal Ninja VR pan heads From left: NN4 with RD-16 II Advanced Rotator, RS1 with Mini Rotator, Ultimate R1with Mini Rotator (and "shaved" Nikkor 10.5mm) |
For high resolution panorama photography, I chose the Nodal Ninja 4. I use this head when shooting multi-row panoramas, or even single row panoramas with zenith and nadir shots, such as with Nikkor 16mm (full frame fisheye), 14mm (rectilinear), and 18mm (rectilinear) lenses on the Nikon D800. This head can be used with lenses up to 100mm, and can be configured for just about any DSLR. Some photographers are even using it to shoot high resolution gigapixel mosaics. Bill Bailey has done a number of tests, and reports that it’s possible to shoot these manually as quickly as one shot per second.
When you’re looking to shoot high resolution panoramas, the NN4 is a great choice to combine with the Nikon D800. I like the inclusion of user positioned “rail stops” on both the horizontal and vertical arms of the head. This allows photographers to position their camera and lens properly (so the entrance pupil or no-parallax point is aligned with both rotation axes), and then quickly return everything to that alignment even after disassembling the rig for transport. Index lines engraved on the arms also facilitate repeatable alignment.
I found that aligning the entrance pupil of a particular lens and camera on the head was something best done in a controlled environment. It is not something you want to find yourself having to do on location where the risk of dropping anything is possible, or where you have to figure out how various parts should be connected under pressure of a shooting deadline. (To be fair, this is also true of many competing VR pan heads.) Nodal Ninja does include a small selection of spare parts with most of their products, just in case you do lose something. While this is a nice touch, I prefer designs where the manufacturer makes it difficult or impossible to lose any part of the head under normal use, and everything is self-contained.
Initial assembly of the head is not always intuitive, and the heads I received did not contain much in the way of printed instruction or manuals. Fortunately, Nodal Ninja posts most of its User Manuals online. Be aware that some are not very detailed. Bill Bailey wrote that more detailed manuals are forthcoming, along with additional videos and other instruction materials. See:
http://shop.nodalninja.com/qrg-manuals/
http://shop.nodalninja.com/tutorials/
Nodal Ninja’s customer service efforts, however, are exceptional. Bill and his staff are readily available by e-mail or phone for necessary advice and assistance.
One of the only concerns I had with the Nodal Ninja 4 head was the 1/4”-20 attachment screw, which holds the camera in position on the head. In order to tighten the camera onto the plate, one needs to have a flat blade screwdriver or coin available. Not only is this impractical at times – working in the cold with gloves on, for example, but the screw can be easily dropped and lost, rendering the head useless (since this is the only way to attach the camera).
If you’re using the same mounting plate for all your other camera supports, this might not be a problem. I tend to favor Manfrotto tripods and use their mounting plates. But, I don’t like keeping any plate attached to my camera unless I actually need it. The plate adds weight and gets in the way, particularly when I want to mount a camera to a different, non-compatible support.
Again, I prefer to see VR pan heads that are self contained, requiring no other tools (like screwdrivers, Allen wrenches, etc.) to use, and to have any parts that loosen during normal use (such as indent knobs or rotation locks) either captive or tethered to the system so they won’t get lost when disengaged. This is critical, I feel, when the loss of any such piece would render the head useless.
![]()
Ninety to 95 percent of my panoramic VR photography is done with a full frame Nikon digital camera and a Nikkor 16mm f/2.8 full-frame fisheye lens. This has provided the best tradeoff between resolution, quality, and speed. It requires shooting six vertically oriented images (every 60°), plus zenith and nadir shots, to fully capture a 360°x180° equirectangular panorama.
A far more efficient method, however, is to use a shaved Nikkor 10.5mm lens on a full-frame Nikon, which requires only four vertical images (every 90°) without need for zenith and nadir shots. The drawback to this has been decreased detail and resolution relative to the results of the 16mm. In the past, this has made the 10.5mm combination useful only for lower resolution online applications such as real estate tours.
My tests with the 10.5mm and D800 provided similar quality results to using the 16mm and a Nikon D3, making the 10.5mm lens suddenly far more attractive for higher quality imaging.
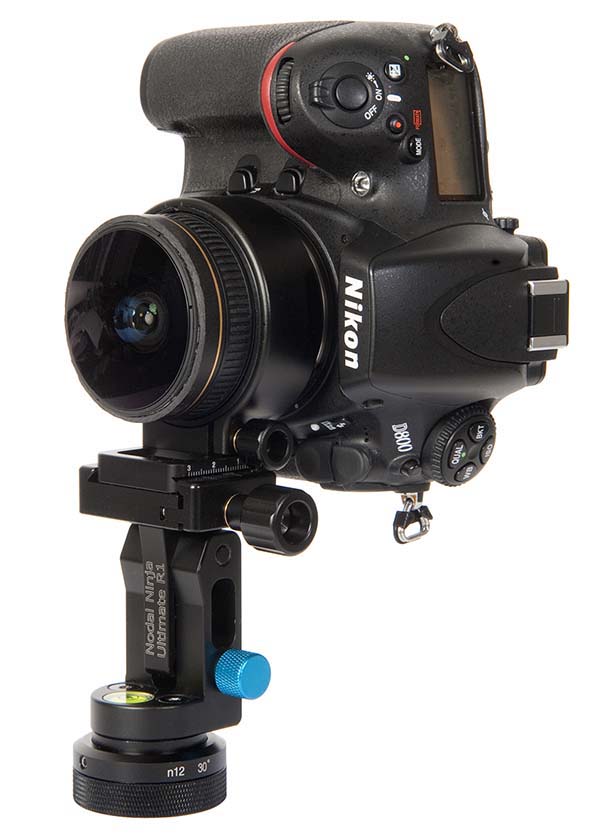 |
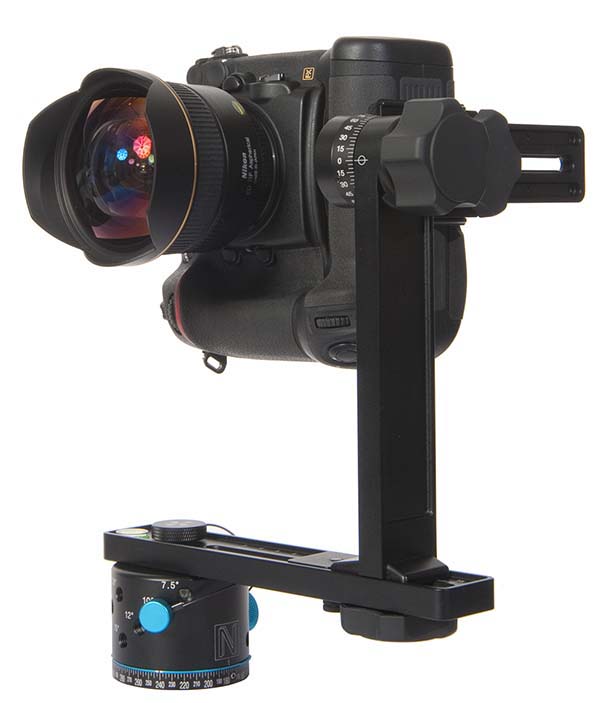 |
Nodal Ninja Ultimate R1 head, Rotator Mini, Nikon D800 & 10.5mm lens |
Nodal Ninja 4, RD-16 II Advanced Rotator, Nikon D800 & MB-D12 |
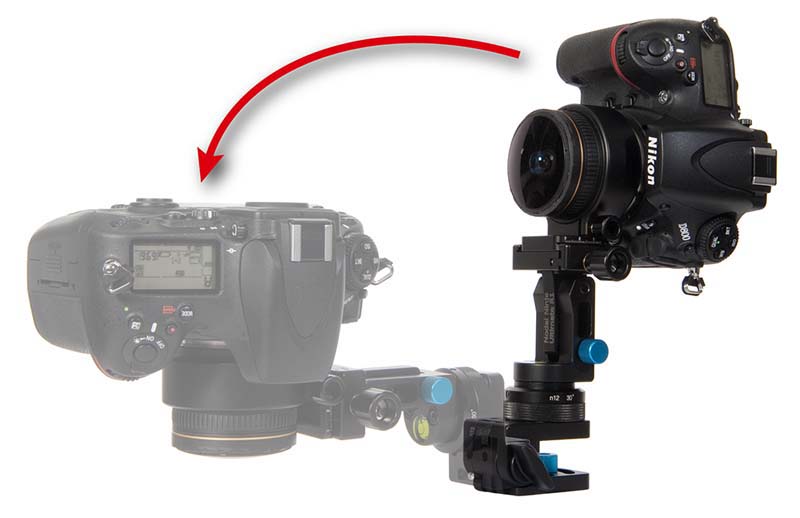
The Nodal Ninja R1 and Mini Rotator is an ideal combination, as it is very small and light. (The RS-1 model is similar to the R1, with its small size, but it allows for multi-row shooting or tilting of the camera and lens at its entrance pupil to capture zenith and nadir images.) The camera can be mounted via a ring mount attached to the lens, including full frame fisheyes like the Nikkor 16mm or 10.5mm.
Both the R1 and the RS-1 can be ordered with either a Mini Rotator (the smallest) or an RD5 rotator with your choice of pan increments (3 shots – 120°, 4 shots – 90°, 6 shots – 60°, 10 shots – 36°, or 12 shots – 30°).
While I get good results using only four shots with the 10.5mm and D800, I prefer to use six, but I like having the option to do either. Therefore, I chose a 12-shot (30°) rotator. With this, I can shoot every 60° by skipping every other detent, or shoot every 90° by skipping to every third detent (as well as having an option for 12 shots (every 30°) if I want additional images to work with.
 |
Click here for VR panorama – Nikon D800, Nikkor 10.5mm f/2.8 lens on Nodal Ninja Ultimate R1 head with Mini Rotator – no zenith or nadir. |
Another advantage of the Nikkor 10.5mm and the Nodal Ninja R1 combination is the fairly small footprint resulting in the stitched nadir area. This makes retouching or repairing the nadir much easier in post production, and the shooting process very efficient.
Nodal Ninja offers a Nadir Adapter for the R1, which allows the entire camera and head to be tilted downward 90° in order to capture a nadir image for use in retouching the stitched panorama. While a handy option, its use requires that the camera support / tripod be moved sideways a similar distance, as well as raised a bit in order to position the lens in the same spot as it was for the rest of the source images. This is an imprecise process, at best, and does slow the shooting process down considerably. However, when using stitching software such as PTGui or Pano2VR, it’s possible to do nadir patching quite effectively with nadir shots that are not perfectly aligned.
http://www.ptgui.com
http://gardengnomesoftware.com/pano2vr.php
 |
 |
Nodal Ninja Ultimate R1 with Nadir Adapter – Nikon D800 & "shaved" 10.5mm |
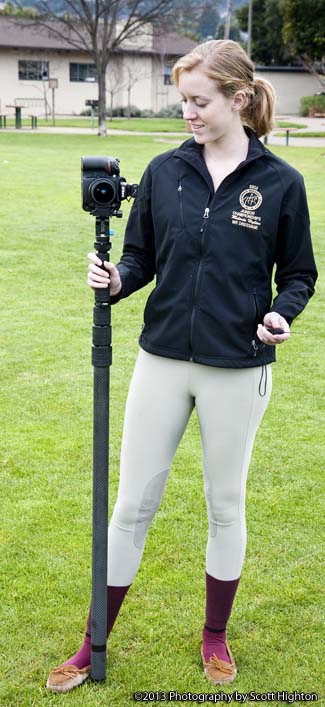
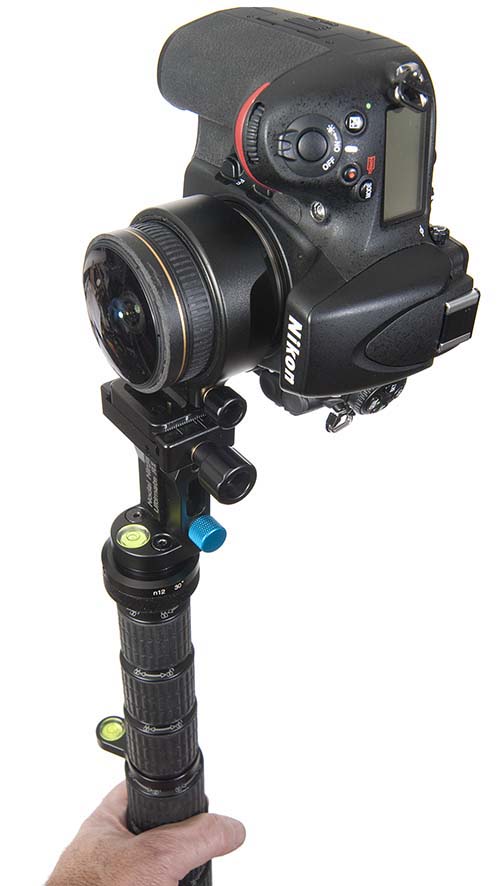
Ultimate R1 mounted on Fanotec pole |
I think one of the greatest advantages of the combination of R1, Nikkor 10.5mm, and D800, is for pole panoramas. The entire setup is fairly small and lightweight – important considerations for maintaining control when extending a pole system up or out any distance. I find that the use of a wireless remote for pole panoramas is essential (these are available for most DSLRs through Nodal Ninja), although some photographers prefer hard-wired remote releases for aerial and extreme shooting conditions where wireless control is easily compromised.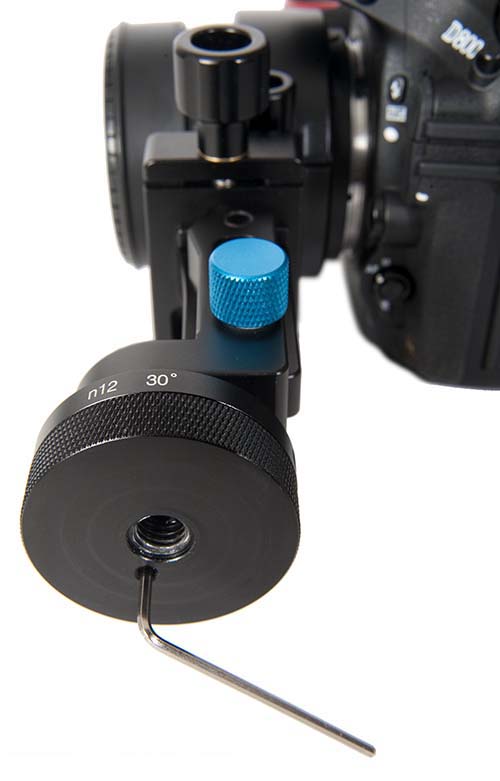
When using the R1 on a pole, you need to make sure the rotator is locked so it won’t rotate. Rotation for pole panoramas is generally done by rotating the entire pole, not just the camera on the head. If the R1’s rotator is not locked on the end of the pole, the camera’s weight will cause the head to rotate independently of the pole, and you will have no real control over where its pointed.
In order to lock the rotation on the R1’s Rotator Mini head, you have to tighten a small set screw underneath the base of the unit. This requires that the head be removed from the pole, and that you use a small #2 (metric) Allen or hex wrench. (A 5/64” Allen wrench can also be used.)
The problems with this design are two fold. The first is that the head has to not be mounted on its tripod or pole in order to lock / unlock the rotation. The second is, again, that a small, easily lost tool is required to make the adjustment. Without this tool, the panorama head becomes useless if it’s not already configured the way you need it.
A better design would be some sort of captive lock knob on the side of the head, which can be loosened by hand to allow rotation, or tightened to lock it, and should be adjustable with the head mounted on a pole or tripod. This design is actually used on other Nodal Ninja rotators such as the RD5, but was not included in the Rotator Mini for the R1 in an effort to keep weight down and pricing low, according to Nick Fan.
Of course, if you are only planning to use the R1 for pole panoramas, there's no need to have the Rotator Mini attached to the head. You can simply use a pole rotator at the base of the pole itself.
![]()
Nodal Ninja also offers well designed Fanotec carbon fiber pole systems for pole panorama shooting. Carbon fiber materials are very lightweight and stiff, and the Fanotec poles have become industry favorites. Their basic Series 1 or 2 pole extends to about nine feet, but addition of an extension essentially doubles this (to about 18’). For most vertical pole panoramas, the nine-foot height is quite adequate. Much higher and you tend to lose the immediacy or “immersive” feeling of being in a scene, because you’ve moved the camera too far away from your subjects. Certainly, there are situations that warrant more extension, so it’s nice to have that as an option. Just keep in mind that the extension unit does add weight and size to the pole. Also, be aware that carbon fiber materials conduct electricity very well, so utmost caution must be taken in avoiding use of pole camera systems around electrical wires or other electrocution dangers.
Fanotec Pole System 1 with System 2 Extension |
 |
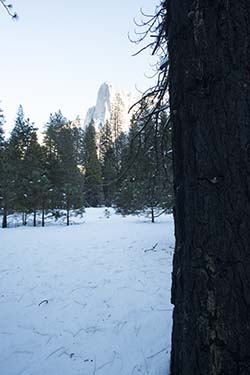
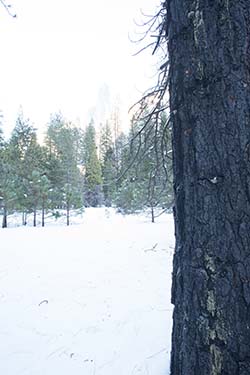
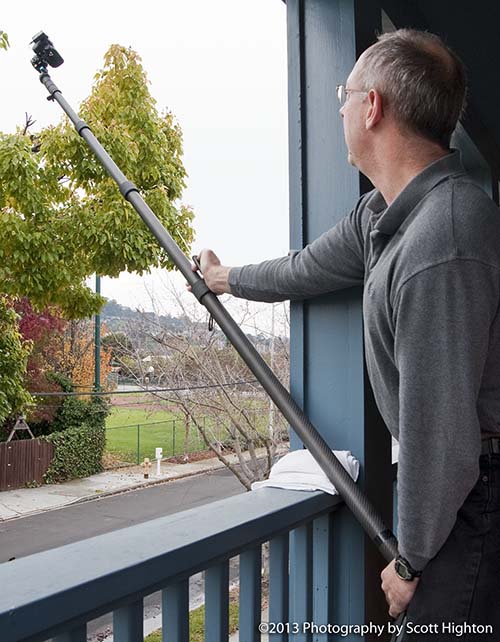
When you want to extend your pole camera at a less-than-vertical angle, rather than just straight up or down, having the extension system on a Fanotec pole can be an advantage. One should not even consider extending a camera horizontally to the pole’s full 18’ length. It’d be almost impossible to balance or control it, and the poles have not been designed for such extreme pressures, according to Bill Bailey. However, when extending the pole system within a six-to-10 foot range, it’s better to have more sections and only extend each section partially, rather than to use full extension of only one or two sections. Partial extension keeps the entire system stiffer and more easily controlled.
I find when using a pole at a non-vertical angle, that it’s best to rest it on a railing or other fulcrum point, and to have as much extension as I can on the inside of this point so I can better balance and control the extended camera sections outside. I also find it useful to rest the pole a small towel or other padding to make rotating smoother and prevent damage to either the pole or the fulcrum it’s resting on.
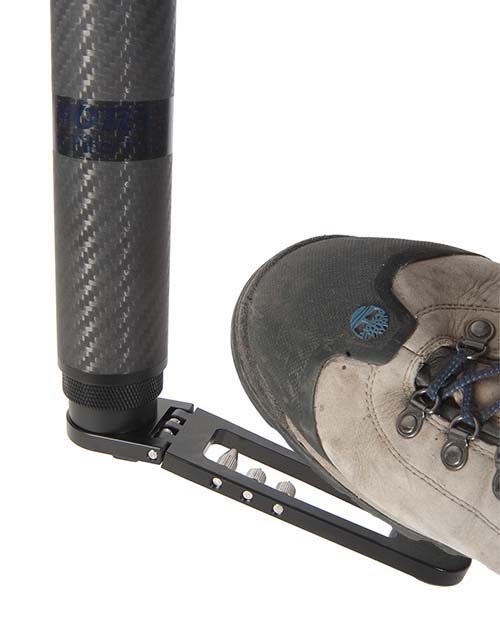 |
 |
Foot plate and rotator for Fanotec pole |
Non-vertical use of Fanotec pole system with D800 & 10.5mm |
Additional accessories essential to using the Fanotec poles effectively are a foot plate and rotator, which allow for consistent rotation increments with both vertical non-vertical pole positions, as well as a pole level, which attaches to the outside of the pole system and allows you to align the pole vertically for each shot.
For more information on these, and the many other quality Nodal Ninja products available for VR and panoramic photographers, check out the extensive Nodal Ninja web site at:
http://www.nodalninja.com/
![]()
![]()
 |
About the Author: Scott Highton is the author of the acclaimed book, Virtual Reality Photography, and a leader in the VR imaging field, who speaks regularly at industry conferences. Beginning with his pioneering work in the early '90s with Apple and their development of QuickTime VR, he's been an innovator in panoramic VR photography, and has collaborated with a number of industry manufacturers in bringing improvements to their photographic and VR imaging products. |